
Technician help — for technicians. Your jobs, testing a scale step by step, finishing up, and what to do when something unusual happens.
Welcome
This manual teaches you to do calibrations with the CertaCal technician app. It starts with the basics of scale calibration, for anyone new to the trade, then walks through the app screen by screen: your job list, testing a scale, finishing up, and what to do when something unusual happens.
The app runs in the web browser on your phone or tablet. It keeps working when you have no signal and sends your work to the office when you're back online.
Who does what in CertaCal
Everyone signs in with their own username and password. What you can see and do depends on your role, which the office sets in Settings › Company › Users. You only see what your role lets you act on: pages and lists you can't use don't appear at all. Auditors are the exception: they see everything and change nothing.
| Role | Works in | Can do |
|---|---|---|
| Technician | Technician app (phone or tablet) | Works the jobs dispatched to them, records calibrations, prints stickers, adds a scale found on a job (for the office to check), asks the office for a job. Sees only their own jobs and what each scale needs (its procedure, checklist and tests), not the company's lists, and no office app unless given an office add-on. |
| Reviewer | Office app: Home, Review, In progress, Jobs, Scales, Customers, Test weights, Reports | Reviews finished jobs: audits a sample of each job's scales against the program's quality score, decides anything flagged, and approves the job (which issues the certificates) or sends scales back to the technician; re-sends the job package to the customer. |
| Office admin | Office app | Everything a reviewer does, plus: sets up customers, locations and scales; schedules and dispatches jobs; answers technicians' requests; placed-in-service reports; test weights; reports and exports; settings; users. Approving procedures and tolerance rule sets is left to owners and quality managers. |
| Quality manager | Office app | Everything an office admin does. Owns the quality records: weight certificates, impact reviews, certificate wording, work instructions, checklists; approves procedures and tolerance rule sets. |
| Owner | Office app | Everything, including creating and changing other owners' accounts. |
| Auditor | Office app, read-only | Can look at everything, including Settings and the audit trail, and change nothing. |
| CertaCal administrator | CertaCal's administration address, outside your company | Adds companies, billing, site backups and notices. Not one of your users; sees your records only under Support access. |
This table is CertaCal's default. The owner can change who may approve amendments, rule sets, company policies, procedures and certificate wording, name technical managers, and choose which office pages office admins, quality managers and reviewers see, in Settings › Company › Role permissions. Owners always see everything, auditors always see what this table says, and nobody approves work they did.
Owners, office admins and quality managers who also do calibrations have Works in the field switched on (Settings › Company › Users). They then appear on the Jobs board and can be dispatched like a technician, and see their jobs in the technician app.
Office add-ons (Settings › Company › Users) give a technician parts of the office app without changing their role, for example a senior technician:
- Review: Review, In progress, Jobs, Scales and Customers; reviews and approves other people's jobs.
- Placed-in-service: Government reporting (placed-in-service and USDA P&S test reports), Scales, Customers and Weights & measures; prepares and sends the reports. A reviewer can be given this one too.
A change to someone's add-ons takes effect the next time they sign in.
How a job flows
- The office schedules a visit and assigns it to you. It shows in your job list.
- At the customer, you open the job and test each scale on it.
- Each finished scale is sent to the office (straight away, or as soon as you have signal).
- When every scale is done, the lead technician taps Finish this job. If you're on the crew, record the scales you do; the job shows who leads it, and the lead finishes it, unless your company lets anyone on the crew finish (then you see Finish this job too).
- CertaCal scores every scale you did from its record (see How your work is scored). A reviewer in the office audits a sample of your scales, always including any that scored low, and approves the job as a whole. That issues the certificates and emails the customer their certificates and a health report.
- If the reviewer finds a problem, or the job scores too low, the scale comes back to you marked Redo, with a note saying what to fix.
Calibration basics
This chapter explains the ideas behind every screen in CertaCal. If you are new to scales and calibration, read it before anything else. Experienced staff can skip to the next chapter.
What a calibration is
A calibration answers one question: when a known weight is put on this scale, does the scale show the right number? We place certified test weights on the scale, read the indicator, and compare the reading with the weight we know is there.
The difference between the reading and the true weight is the error. Every scale is allowed a small error, called the tolerance. If the error is inside the tolerance, that point passes. If it is outside, it fails.
We write down what we found, adjust the scale if it needs it, test again, and give the customer a certificate that records all of it.
The words you will see every day
| Term | What it means |
|---|---|
| Capacity | The most the scale is built to weigh, for example 5,000 lb. |
| Division (d) | The smallest step the indicator shows, for example 1 lb or 0.1 lb. Also called the scale interval or graduation. |
| Number of divisions (n) | Capacity ÷ division. A 5,000 lb × 1 lb scale has 5,000 divisions. |
| Accuracy class | How precise the scale is designed to be: I, II, III, III L or IIII. Most shipping, floor and truck scales are Class III or III L. Lab balances are Class I or II. |
| Tolerance | The largest error allowed at a given load. It is counted in divisions (1 d, 2 d, 3 d...) and grows as the load gets heavier. |
| Error | The reading minus the true (applied) weight. A reading of 1,001 lb with 1,000 lb applied is an error of +1 lb. |
| As Found | The readings before you adjust or repair anything. This is how the scale was performing for the customer. |
| As Left | The readings after your adjustments. This is how you are leaving it. |
| Test weights (reference standards) | Your company's certified weights. Each weight is traceable to national standards through a lab certificate. |
| Legal for trade | A scale used to buy or sell by weight (a deli scale, a truck scale at a scrap yard). These are regulated by the state. |
Why As Found matters
The As Found readings tell the customer whether the product they weighed since the last visit was weighed correctly. If a scale fails As Found, the customer may need to look back at what they weighed. That is why you always record As Found before you touch anything, even if you can see the scale is off.
Where the tolerances come from
In the United States, scale tolerances come from NIST Handbook 44 (HB44), Specifications, Tolerances, and Other Technical Requirements for Weighing and Measuring Devices. The Scales Code in HB44 has a tolerance table (Table 6) that gives the tolerance, in divisions, for each accuracy class and load.
CertaCal does this arithmetic for you. For each test point it works out:
- How many divisions the test load is (load ÷ division size).
- Which band of the table that falls in for the scale's class.
- The tolerance in divisions, converted back to pounds or kilograms.
For example, a Class III scale with 0.1 lb divisions:
| Test load | Divisions | Maintenance tolerance |
|---|---|---|
| 0 lb | 0 d | 1 d = ±0.1 lb |
| 100 lb | 1,000 d | 2 d = ±0.2 lb |
| 300 lb | 3,000 d | 3 d = ±0.3 lb |
| 500 lb | 5,000 d | 5 d = ±0.5 lb |
Maintenance and acceptance tolerances
HB44 has two sets of tolerances:
- Maintenance tolerances apply to scales already in service. This is what almost every routine calibration uses.
- Acceptance tolerances are tighter (half the maintenance values for most classes). They apply to a scale that is new, newly installed, or just returned to service after major repair.
The office sets which one a scale is judged against (its tolerance basis). Some customers set their own tighter tolerances; the office can set those too. CertaCal shows the tolerance next to every reading, so you do not have to look it up.
The tests
The office decides which tests each scale gets. The technician app walks you through them in order. The common ones:
| Test | What you do | What it shows |
|---|---|---|
| Shift test (quadrants or corners) | Put the same weight on each corner or quarter of the platform and read it each time. | Whether the scale reads the same wherever the load sits (load cells matched, platform level). |
| Increasing load (build) | Add weight in steps, from zero up toward capacity, reading at each step. | Accuracy across the range (linearity). |
| Decreasing load (drop) | Take weight off in steps on the way back down. | Whether the scale follows the load down (hysteresis). Some customers ask for it; it is set per customer. |
| Zero return | Remove all the weight and check the scale returns to zero. | The scale isn't holding a false zero. |
| Repeatability | Put the same load on several times. | The scale gives the same answer each time. |
| Section test | For vehicle and truck scales: a test load on each section. | Each section weighs correctly. |
| Strain-load / substitution | For large scales where you can't bring enough certified weight: build a known load in steps using other material. | Accuracy above the weight you have with you. |
Each test shows the HB44 reference and a recommended load (for example, a shift test near one-third of capacity). You can use a different load if you don't have the weights with you. The app warns you when a load is below the recommendation; it is only a warning.
Test weights and traceability
Our weights are only useful if we can prove they are right. Every test weight is calibrated by an accredited lab, which issues a certificate with an expiry (recertification) date. That chain — our weights to the lab's standards to national standards — is called traceability.
When you record which weights you used, the certificate you issue is traceable. If a weight's certificate has expired, CertaCal warns you. To start, it doesn't stop you working, but the office has to explain it before the customer's certificate can go out. A company can choose to block it instead (Settings › Calibration › Company policies): then a calibration can't be sent until it's on current weights.
Legal-for-trade scales and placed-in-service reports
When a legal-for-trade scale is installed, repaired, moved, or removed, the state weights-and-measures office must be told. The form is a placed-in-service report. In California it goes to the county sealer; in Arizona to the state; other states have their own office and deadline, which the office sets up in CertaCal. CertaCal builds these reports automatically from your calibration and the office sends them.
Weights-and-measures inspectors may put a tag on a scale:
- Red tag — out of service. It can't be used until repaired and released.
- Blue tag — stop-sale / stop-use order.
- Yellow tag — a warning to fix something.
If a scale has a tag, you record it in the app, with the tag number and who approved putting it back in service.
Legal-for-trade scales also carry an NTEP (or California CTEP) Certificate of Conformance number — the CoC — on the data plate. It proves the model was type-approved. CertaCal asks you for it the first time you test the scale if the office doesn't have it.
Uncertainty (in short)
No measurement is perfect. Measurement uncertainty is an estimate of how far off our own measurement could be, from the weights' uncertainty, the scale's resolution and so on. ISO/IEC 17025-accredited certificates report it. CertaCal calculates it from the weights you pick; you don't have to work it out by hand.
Getting set up
What you need
- A phone or tablet with a current web browser (Chrome on Android, Safari on iPhone and iPad).
- Your username and starting password from the office.
- The CertaCal address the office gives you.
- For stickers, if your company prints them in the field: a label printer paired with your device (a Zebra, a portable Bluetooth printer, or any other label printer).
Signing in
- Open the browser and go to the CertaCal address.
- Type your username and password and tap Sign in.
Usernames are your first initial and last name, in lower case, for example jsmith for Jane Smith. Capitals don't matter. If two people share an initial and last name, whoever was added second uses their first name and last initial (johns for John Smith).
You stay signed in on that device. Your name shows at the top of the screen so you can check whose account it is. Menu at the top right has Help, Terms, Appearance, the app's version and Sign out (sign out if you share the device). Appearance is Light, Dark or Same as this device: Dark is easier on the eyes in a dim scale pit, Light easier to read in bright sun. It works offline, and your choice follows you to the office and any other device you sign in on. When CertaCal has been updated, a bar above the tabs says A new version of CertaCal is ready: tap Update (anything you were working on is kept on the phone).
The Android app
Your office may give you CertaCal as an Android app instead of the web page. It's the same app, and it works offline the same way.
- Your office sends you the app file. Tap it to install, and allow your phone to install it when it asks.
- Open CertaCal. It starts on the practice company (demo). Tap Change on the sign-in screen, then Scan setup code, and scan the code your office printed for you. Or type your company's CertaCal address. The app asks you to confirm the address before it switches: only say yes to your own company's address, since your password goes there. It won't change company while anything you did hasn't been sent yet; sign in where it was done, with signal, and let it send first.
- Sign in with your username and password.
21 CFR Part 11 customers. Some customers are FDA-regulated, and their records are signed electronically under 21 CFR Part 11. You don't sign them: the reviewer's approval in the office is the signature, and your own sign-in identifies your work. If you take back one of those scales after finishing, the app asks why; the reason is kept with the record.
New password needed. If your company asks for a new password every so often, signing in after that long asks you to choose one (not one of your last 5). Do it when you have signal: until you do, the app can't sign in.
Locked. If your company has set a time (Settings › Security), the app locks after that long without a tap: enter your password to carry on. Nothing is lost, and work waiting to be sent stays on the phone. It unlocks without signal too, as long as you've signed in on this phone with your password before. If it says to connect first, you haven't yet: carry on once you have signal. Too many wrong passwords lock your account, as at sign-in; ask the office to unlock it.
Menu shows which company the app is signed in to. To switch companies, sign out, then tap Change. The app updates only when your office gives you a new version; Menu says when one is available.
For stickers, pair the printer in your phone's Bluetooth settings first. Then, under Printer, pick Bluetooth printer (TSPL), choose it from the list, and allow Nearby devices when the phone asks.
Put the app on your home screen
If you use CertaCal in the browser rather than the Android app:
Put CertaCal on your home screen so it opens like any other app and works with no signal:
- Android (Chrome): menu (three dots) → Add to Home screen.
- iPhone / iPad (Safari): Share button → Add to Home Screen.
The sync light
The pill at the top right tells you whether the office has your work:
| Shows | Means |
|---|---|
| ● Synced | Everything you've finished has reached the office. |
| ● 2 sending… | Two things are on their way to the office. They go by themselves while you have signal. |
| ! 2 waiting to retry | The office server didn't take two things when the app tried. Nothing is lost: the app tries again by itself, waiting a little longer after each failed try (from 30 seconds up to 30 minutes). |
| ! 1 needs attention | Something has failed many times, or the office server didn't accept a calibration and it needs fixing. This one is white with red writing so it stands out. |
| ● Offline | No signal. Keep working; nothing is lost. Offline · 2 to send means two things will go when you have signal. |
If your company is made read-only (it is leaving CertaCal), a Read-only banner shows at the top. You can still open your jobs and see everything, but you can't start, change or finish anything, so nothing is recorded that could never be sent. Work you finished before that stays on the phone; tell the office.
Tap the pill, or the Sync tab at the bottom, to see what is waiting. Each line says what it is (a finished calibration, a photo, a quote request and so on), which scale and customer it is for, and, if a try failed, why and when the app will try again. Sync now tries everything straight away, including anything waiting to retry. A calibration the office server didn't accept is listed at the top under Not accepted — needs fixing, with Open job to go and fix it. The Help tab opens this guide in a new tab, with a search box, so you can look something up without losing your place.
Backups: clearing the browser or resetting the phone
Your work lives on the phone until it reaches the office. Clearing the browser's data, reinstalling the browser or resetting the phone would wipe anything not sent yet, so CertaCal keeps a backup:
- By itself, while you have signal: work the office doesn't have yet (unfinished scales, their photos and signatures, anything waiting to send) is copied to the office server, a few seconds after each change. Once everything has been sent, the copy is removed. The Sync tab shows when the last copy was made; Back up now makes one straight away.
- A backup file, for no signal: on the Sync tab, tap Save a backup file before the reset and keep the file somewhere that survives it (Files, Google Drive or iCloud, or email it to yourself). Afterwards, sign in and tap Restore from a file.
After a reset, sign in with signal: the app shows Work that hasn't reached the office with where and when it was saved. Tap Restore it here and it's back where you left it, sending by itself. Throw it away deletes it for good.
Backups are locked to you: only your sign-in opens them, on any phone. The office server keeps a copy for 45 days. The demo keeps no backups, since everyone shares its technician.
Your jobs
The job list
The Jobs tab shows the visits assigned to you, with the ones still to do at the top.
| Badge | Means |
|---|---|
| Scheduled | The office has booked the visit for you. |
| In Progress | You've started it. |
| Completed | You've finished; the office is reviewing. |
| Waiting for the office | You asked the office for this job; they haven't accepted it yet. You can't open it yet. |
| Declined | The office turned the request down. Their reason shows under it. |
Notices from CertaCal
A notice from CertaCal sometimes shows above your jobs: planned maintenance, a new feature or an important change. Tap × to close it for good. A notice marked Important stays until it ends. Notices need a connection: with no signal there's no notice, and the app works as usual.
Opening a job
Tap a job to see its scales. Each scale shows its serial number and when it's due.
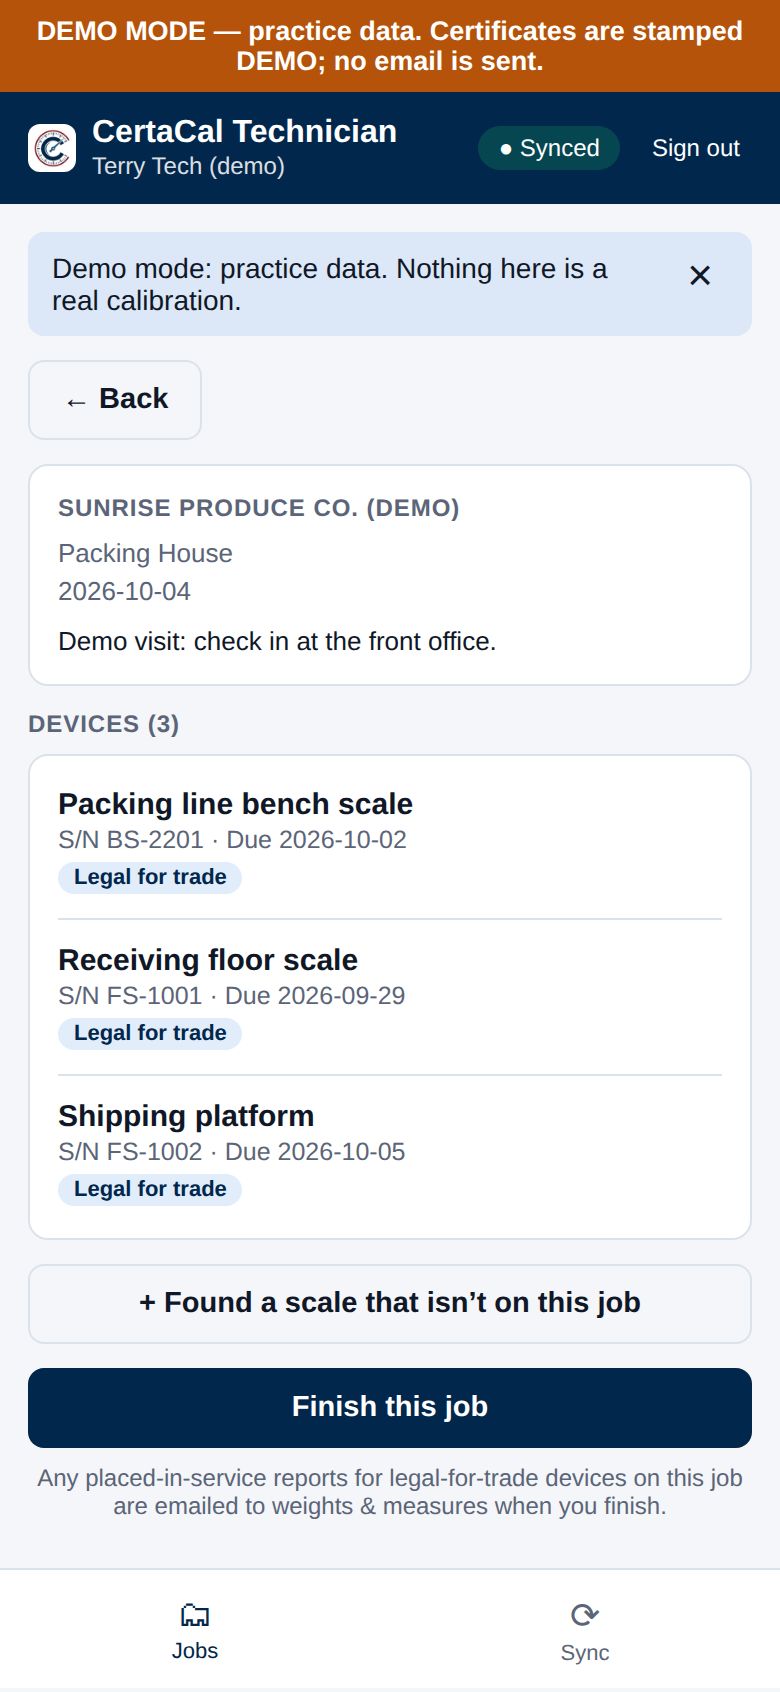
Things you may see on a scale:
- Legal for trade — a commercial scale. If it says CoC number needed, read the NTEP/CTEP number off the data plate during the test.
- 📝 Note from last visit — the last technician left you a note. It shows again when you open the scale.
- Manuals (2) — the maker's manuals the office keeps for this make and model. Tap to list them and tap one to open it. Your phone keeps a copy of each for the jobs on it when you open the job list or a job with signal, so they open without signal later; on this phone shows which are saved.
- Returned by the office — the reviewer sent it back. Read their note, then test it again. The badge says Redo.
- Badges on the right: In progress (started on this device), 🔒 Locked · waiting to sync (finished, no signal yet), 🔒 Syncing, 🔒 Synced (the office has it), Approved, Not inspected.
The office's notes for the visit (gate codes, contacts, times) show at the top of the job.
Scanning a scale's sticker
When your office prints QR codes on its stickers, Scan sticker on the Jobs tab opens a scale straight from its sticker. Point the camera at the QR code on the sticker, or at the QR code on one of the scale's certificates. The app shows:
- the scale, its customer and location, and when it's due;
- Start calibration for each of your open jobs it's on: the job opens and the scale starts, or carries on where you left it;
- Ask for service: Request a job with the customer, location and this scale already filled in (see Asking for a job);
- its History: each certificate's date, result and number, with the technician's notes.
Only your company's scales open. A sticker or certificate from another company, or a code that isn't a scale's, says so and nothing else. Scanning a sticker with the phone's own camera app still opens the public page anyone sees; the scale's history and work only show in CertaCal.
No camera, or the camera isn't allowed? Type the scale's ID or serial number under No sticker? and tap Find the scale. If more than one scale matches, pick it from the list.
No signal? Scanning still finds the scales on your jobs on this phone, with Start calibration and the last visit's note. The full history, Ask for service, certificate codes and scales that aren't on your jobs need signal.
Asking for a job
Sometimes a customer asks for work that isn't on your list, or calls you directly. You ask for the job in the app:
- On the Jobs tab, tap Request a job.
- Start typing the customer's name and tap it.
- Pick the location if you know it, and the date.
- Under Scales to test, the scales due soon are already ticked. Tick or untick any. If you leave them all unticked, the due ones go on the job.
- Say what the customer needs.
- Tap Send to the office (or Schedule it).
What happens next is your company's choice, and the screen says which before you send:
- The office approves it: the request shows as Waiting for the office. When they accept it, it becomes a normal job with your scales. If they decline, you'll see their reason.
- Scheduled straight away: it's your job at once, on the day you chose, with the scales you ticked. If you already have a job for that customer and location that day, the scales go onto that job instead.
No signal? Request a job still works. It lists the customers your phone saved the last time you opened your jobs with signal, and the scales it listed the last time you asked for that customer and location (with none listed, say which scales in the note; with none ticked, the due ones go on the job). The request is saved on the phone, and the Jobs tab shows it as Waiting for signal until it goes, by itself, once you're back online. + Add scales to test works the same way, from the scales your phone listed when you last opened the job with signal. If the office's server turns a request down when it arrives (a scale retired in the meantime, or the job already finished), the Jobs tab shows why; tap Dismiss once you've dealt with it.
If your office books visits in ERPNext, a new job always waits for them. New customers are set up by the office; call them if the customer isn't in the list.
If your company also uses ERPNext's Tech App
When your visits are booked in ERPNext, ERPNext's Tech App and CertaCal work as a pair: the Tech App runs your day (clock, drive, arrive, parts, report, signature) and CertaCal holds the calibrations.
- The Tech App shows each visit's CertaCal progress on the job, for example CertaCal: 3 of 5 scales, updated as you save calibrations here.
- Finish the scales in CertaCal before you complete the visit in the Tech App. If you complete it early, the Tech App asks why (for example, a scale couldn't be reached); your reason goes to the office with the visit.
- A scale you add in the field is added here, not in the Tech App. Once the office approves it, it appears on the job in ERPNext too.
Jobs sent to your company by email
If you work for a provider that does jobs for a manufacturer, the manufacturer emails each job with a link. Open the link on your phone:
- I have a sign-in: pick your name, type your password and tap Accept the job.
- I'm new: type your name, your email (your sign-in from then on), a password, and your service technician license number if you have one. Tap Accept the job: that makes your account.
- Decline: say who you are and why. The manufacturer sees it.
The manufacturer's terms for the job (what it pays, and how) are on the link and in the email. Accepting the job accepts them.
Then sign in to the app with your email (or username) and password: the job is on your list. You see only the jobs sent to your company.
If you lead your provider's office, jobs sent to it also wait at the top of your job list: pick the technician and tap Accept, or Decline. Your office doesn't use Request a job: the manufacturer sends the work.
Your paperwork. Certificates, reports and stickers carry your company's name with Serviced for the manufacturer's. Placed-in-service reports are your company's to file: when you finish the job, your office is emailed the report, filled in on the state's form, with where to send it and by when. On a finished job, Email me a copy sends you its certificates (once they're issued) and that list.
Tasks on your job
The office may put a list of tasks on the job, for example "Clean the pit" or "Replace the junction box". They show under Tasks on the job screen.
- Tick each task as you do it. Ticking works with no signal: it goes when you're back online, and shows "waiting to sync" until then.
- Note adds a line about what you found or did. The office sees it on the job and on the Customer Service Report.
- Add a task puts one of your own on the list, marked "added in the field". You can untick or remove your own tasks; the office's tasks only come off when the office removes them.
- At Finish this job, tasks not done are counted: "2 tasks not done: finish anyway?". If your company requires tasks to be done, the job can't be finished until they are.
Adding scales to your job
On a scheduled or started job, + Add scales to test lists the customer's other active scales at that location. Tick the ones to test and tap Add them or Ask the office: depending on your company's choice they go straight onto the job, or wait until the office adds them ("Waiting for the office" shows on the job). A scale that isn't in the list at all is a new one: use + Found a scale that isn't on this job.
Calibrating a scale, step by step
Tap a scale on the job to start. The app walks you through numbered steps; the heading shows where you are ("Step 3 of 8"). ← Back goes to the previous step without losing anything. You can also swipe: left for the next step, right to go back. A swipe does exactly what the button does, so where Next is greyed out the page just gives a little shake. Swipes that start on a box, a button, the signature or a diagram are left alone; to turn swiping off, open Menu and untick Swipe between steps.
Step 1: Before you test
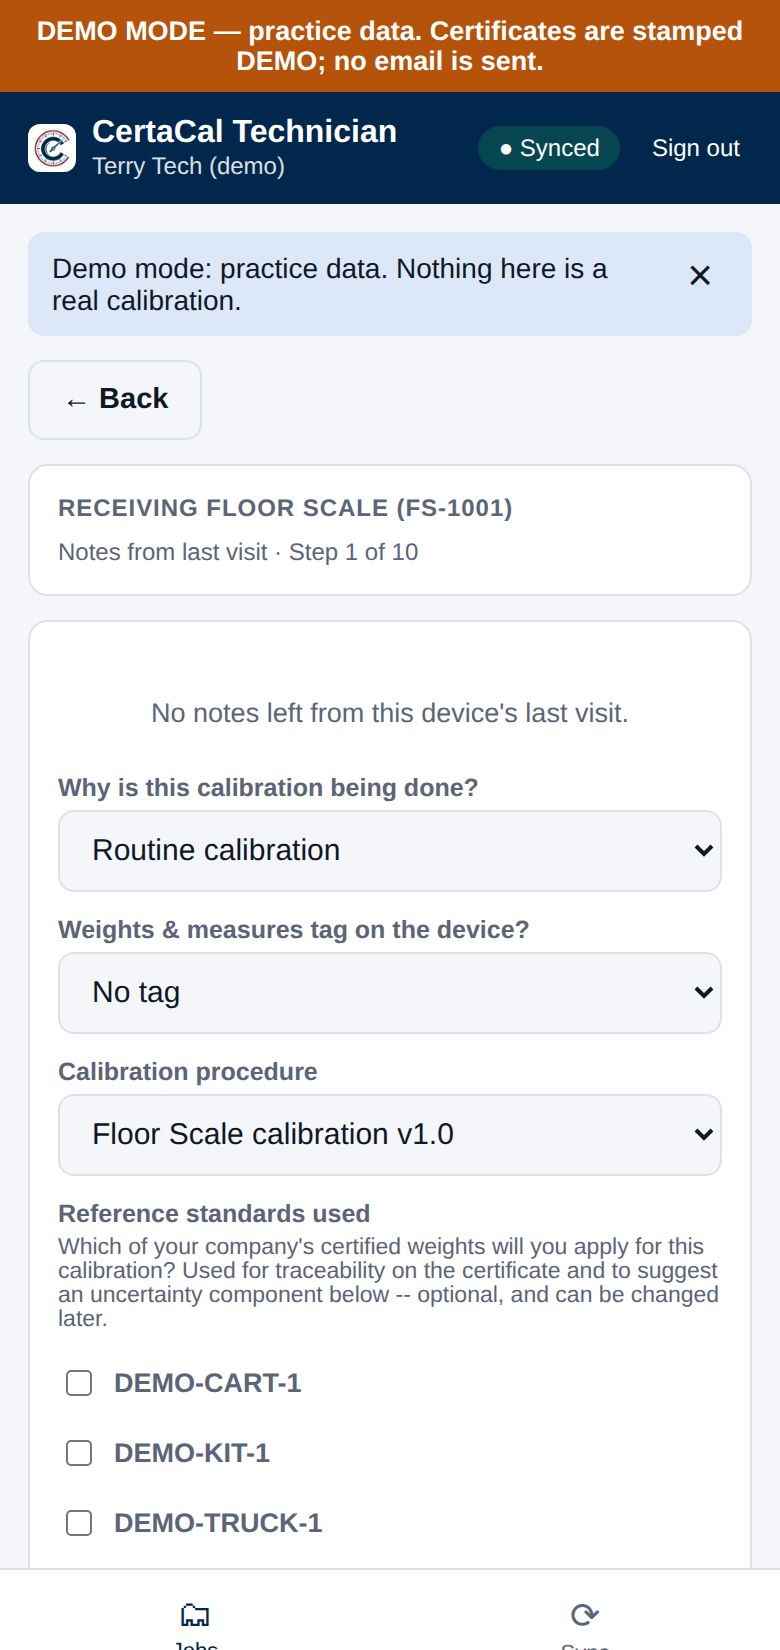
Fill in, top to bottom:
- Note from the last visit and the work instruction card — read them. The work instruction is the procedure the office wants followed on this kind of scale.
- Why is this calibration being done? Usually Routine calibration. Pick After repair, New device placed in service, Device moved, Device added, Device removed or Rental placement when that's what happened. On a legal-for-trade scale these choices create the placed-in-service report for the state, so pick carefully. A calibration normally restarts the scale's interval, so its next due date moves on from today. After repair keeps the next due date it already had; tick Restart the calibration interval from today if the repair should start a fresh interval. To set a different date, fill in Next due date (optional): it wins over both, and has to be after today.
- Weights & measures tag on the device? If an inspector's red, blue or yellow tag is on it, pick the colour, type the tag number, and who approved putting it back in service.
- Approval certificate (NTEP, CTEP or NMI) numbers — asked on any scale the office doesn't have them for: the indicator's and, when the base is a separate component, the base's. Read each off its data plate, or tick has no CoC. An indicator and a base that are separate components each need their own approval certificate (an NTEP or CTEP CoC, or in Australia the NMI Certificate of Approval); if either has none, the device can't be legal for trade. The exception is a single-unit scale, where the base and indicator have the same serial number: one CoC covers it. On a legal-for-trade scale they're needed (highlighted); on any other scale enter them if the plates have them.
- Calibration procedure — normally already picked.
- Test weights (reference standards) used — tick every kit you will actually use. Kits in the scale's unit are listed first. A Due soon or Expired badge warns you about the kit's certificate, and Past state limit means the kit was calibrated longer ago than this scale's state allows for legal-for-trade work (for example 24 months in California, 12 in Arizona), even if its certificate is still current. You can still use it, and the office will deal with it, unless your company blocks weights without a current certificate: then a red box says which weights aren't current and Start testing stays greyed out until you pick a current kit, or tap Choose in the kit and untick the weights it lists. If you have no current weights with you, record the scale as not inspected. Every weight in a kit is recorded unless you narrow it down: tap All 12 weights · Choose under the kit and tick just the weights you're putting on the scale (nothing is ticked to start with; until you tick one, the whole kit is recorded). Narrowing it down matters: if one weight later comes back from the lab out of tolerance, only the calibrations it was ticked on need checking. Use all goes back to the whole kit. Only weights the scale can take count: weights heavier than its capacity are left out of a kit automatically (a cart's 500 lb blocks on a 100 lb bench scale, while its 50s stay), and a kit with nothing light enough isn't listed.
- Anyone else working on this scale? Pick any technician helping you. They are named on the certificate too.
> > - the sensitivity response (beam) or discrimination (dial and digital) at zero and at the maximum test load > - the motion-detection range and the auto-zero range, when the scale has them > - livestock scales: the condition of the gates and racks, the deck and the pit > - monorail and hopper scales: who supplied the test weights and when they were last verified (filled in from the weights you ticked, when their certificates are on file) > - vehicle scales weighing live poultry: the balance on arrival, the empty truck, the test weight added and the truck plus weights (CertaCal works out the error) > - the result (approved, rejected, condemned or other), or whether the errors are within HB 44, and any repairs, recommendations or remarks > > CertaCal checks them against the P&S limits: motion detection within ±3 d on a livestock scale (±1 d on an animal scale), auto-zero within ±0.6 d (±1 d), test weights verified within 3 years, the test reaching the scale's used capacity, and at least 120 days since the last test. A problem shows on the card and goes to the reviewer; it never stops you saving. Still to record lists what the report needs. When you finish a job with a P&S scale, CertaCal asks for the owner's or responsible person's signature, to acknowledge they received the report: get it if someone is there.
Then tap Start testing →.
As Found steps
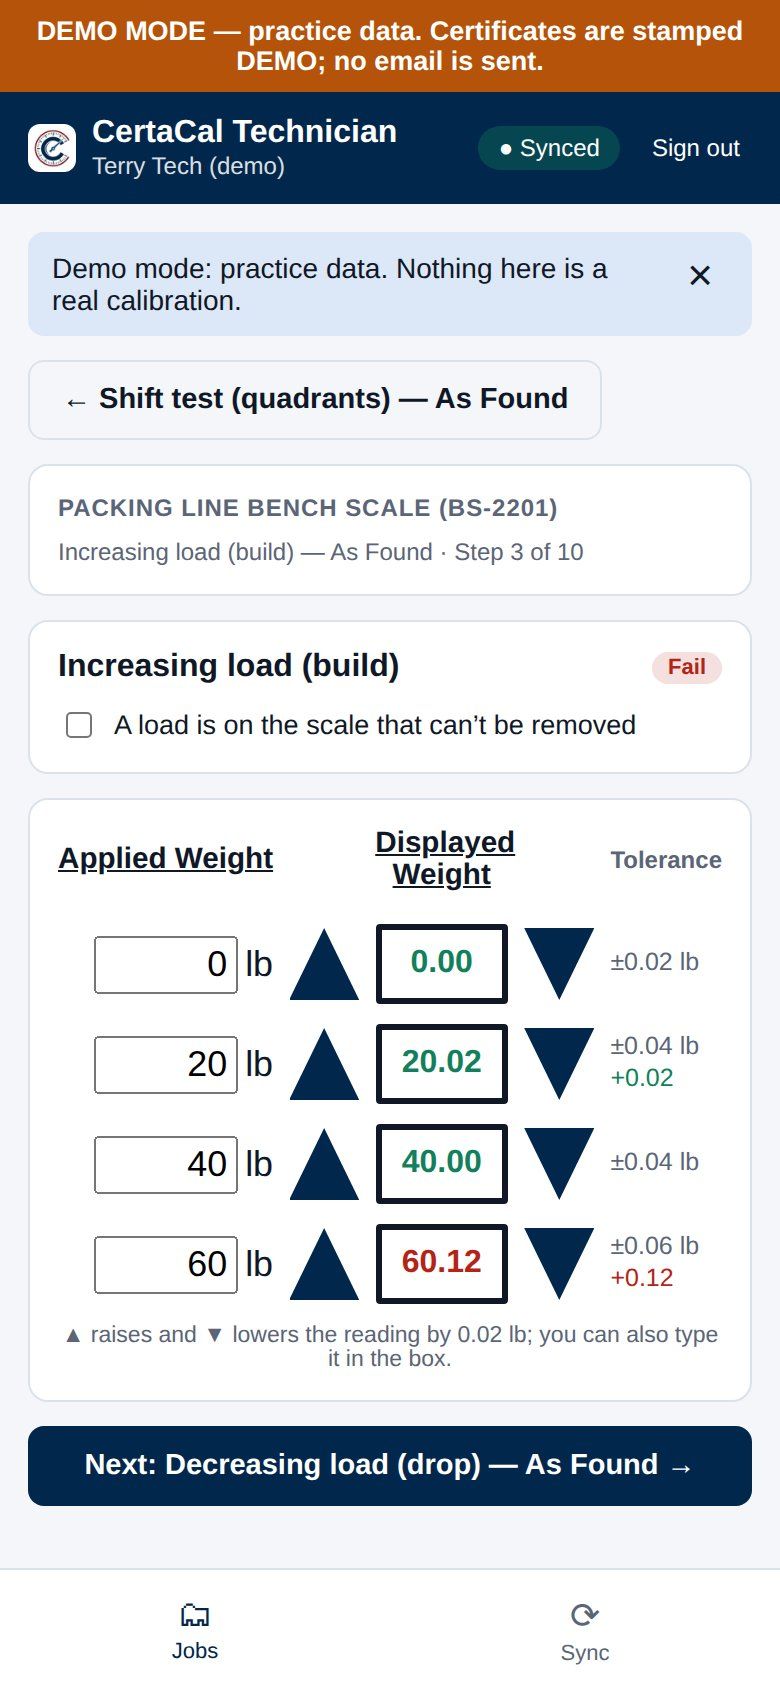
The app now shows one step per test the office set up for this scale, As Found first. Every test is entered the same way:
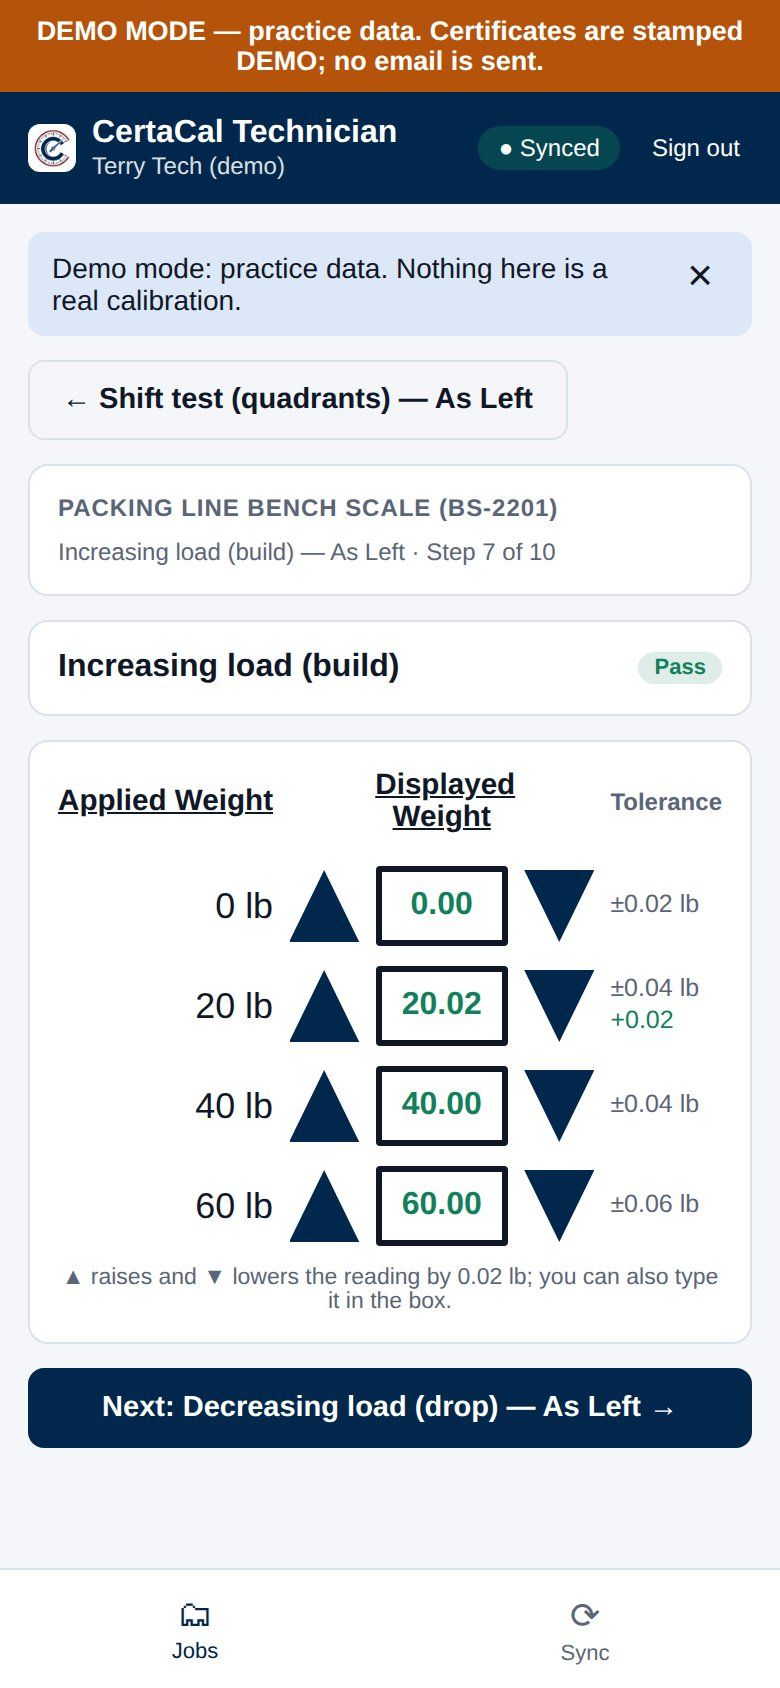
- Applied Weight on the left: the load you put on. It's filled in from the scale's setup. In As Found you can change it if you use a different weight.
- Displayed Weight in the box: what the indicator shows. Tap the solid dark-blue ▲ to raise it by one division or ▼ to lower it by one division, or tap the box and type the reading.
- Tolerance on the right: how far off this point is allowed to be (for example ±0.2 lb).
- The displayed weight turns green when it is within tolerance and red when it's outside. The error shows under it when the reading isn't exact.
The displayed weight is always written with every decimal place the scale shows. On a 100 lb × 0.01 lb scale with 20 lb on it, the box reads 20.00, 20.01 or 19.99, never just "20". That way the record matches the indicator digit for digit.
Speaking the readings
Where your phone can do it, each test has a round microphone button above its readings. Tap it and say what the indicator shows: "one thousand two point five", "ten oh two point five" and "1002.5" all mean 1002.5. You can say the unit ("pounds") or leave it out; a different unit ("kilograms" on a pound scale) isn't entered. Say "minus" for a reading below zero.
- The box being listened for has a blue outline, and the card says which one (for example Position 2 (2 of 4)).
- After each reading the card shows what it heard and what it entered, with Undo. Then it moves to the next box. With Hands-free ticked (the starting choice) it keeps listening until the last reading is in; untick it to tap the microphone for each reading.
- Say "next" to keep the reading already in the box and move on, "back" to go back one, "undo" to take the last reading out, "stop" to stop listening. ‹ Back and Next › on the card do the same with a tap.
- A reading that isn't a step of the scale's division (1002.53 on a 0.5 lb division) is never entered by itself. The card shows it and offers the readings either side (Enter 1002.5, Enter 1003); tap the right one or say it again.
- Nothing is saved until you go on, as with tapping: check the readings (green or red) before Next.
Where it works: CertaCal's Android app, Chrome or Samsung Internet on Android, Safari on iPhone and iPad (iOS 14.5 or later, with Siri switched on, and in Safari itself, not from an icon added to the Home Screen), and Chrome on a laptop. It doesn't work in Firefox, so the button isn't shown there.
Signal. In a browser it needs a signal: the speech goes to Google's or Apple's service to be recognised. The Android app uses the phone's own speech recognition and asks it to work on the phone where it can, so many phones hear readings with no signal at all, if the phone has its offline English speech pack. Pixel phones usually have it already; on other phones (Samsung, Motorola and others) it depends on the phone and on whether English (US) has been downloaded for offline use: look in the phone's keyboard, voice typing or language settings for offline speech recognition or offline voice typing (the names differ from phone to phone). Don't rely on it before you've tried it: put the phone in Airplane mode in the yard, tap the microphone and say a reading. Without a signal or the pack, the card says This phone needs a signal or its offline speech pack for voice; tap the arrows or type as usual.
The first time, the app (or browser) asks to use the microphone: tap Allow (in the app, Allow microphone first, then While using the app). If you refused, the card says the microphone is blocked: in the app, Open app settings takes you to CertaCal's page in the phone's settings (Permissions › Microphone); in a browser, allow it in the browser's settings for the CertaCal site. Or keep tapping. Your company can switch voice off (Settings › Field work › Field rules).
This layout is used for the build (increasing load), drop (decreasing load), section, repeatability, zero return and the other single checks. The drop test's suggested loads are every build step back down, or, if your company chose HB 44's method, each tolerance breakpoint below the top load (or half the top load on a small scale).
Shift test. The shift test is drawn as a picture of the platform, seen from above, with the applied weight at the top. c1 is the top-left corner, c2 bottom left, c3 bottom right and c4 top right; Q1 to Q4 are the quadrants inside them, in the same order. For corner testing you fill in the c boxes; for quadrant testing the Q boxes (the others are drawn dashed so you can see where the load goes). Put the test weight on each position in turn and enter its reading with the ▲ ▼ beside it, or type it. Each box turns green or red the same way. On a tank or hopper the corner test is your call: untick Done on this scale if the corners can't carry a load, or enter the weight you could hang or support on each corner.
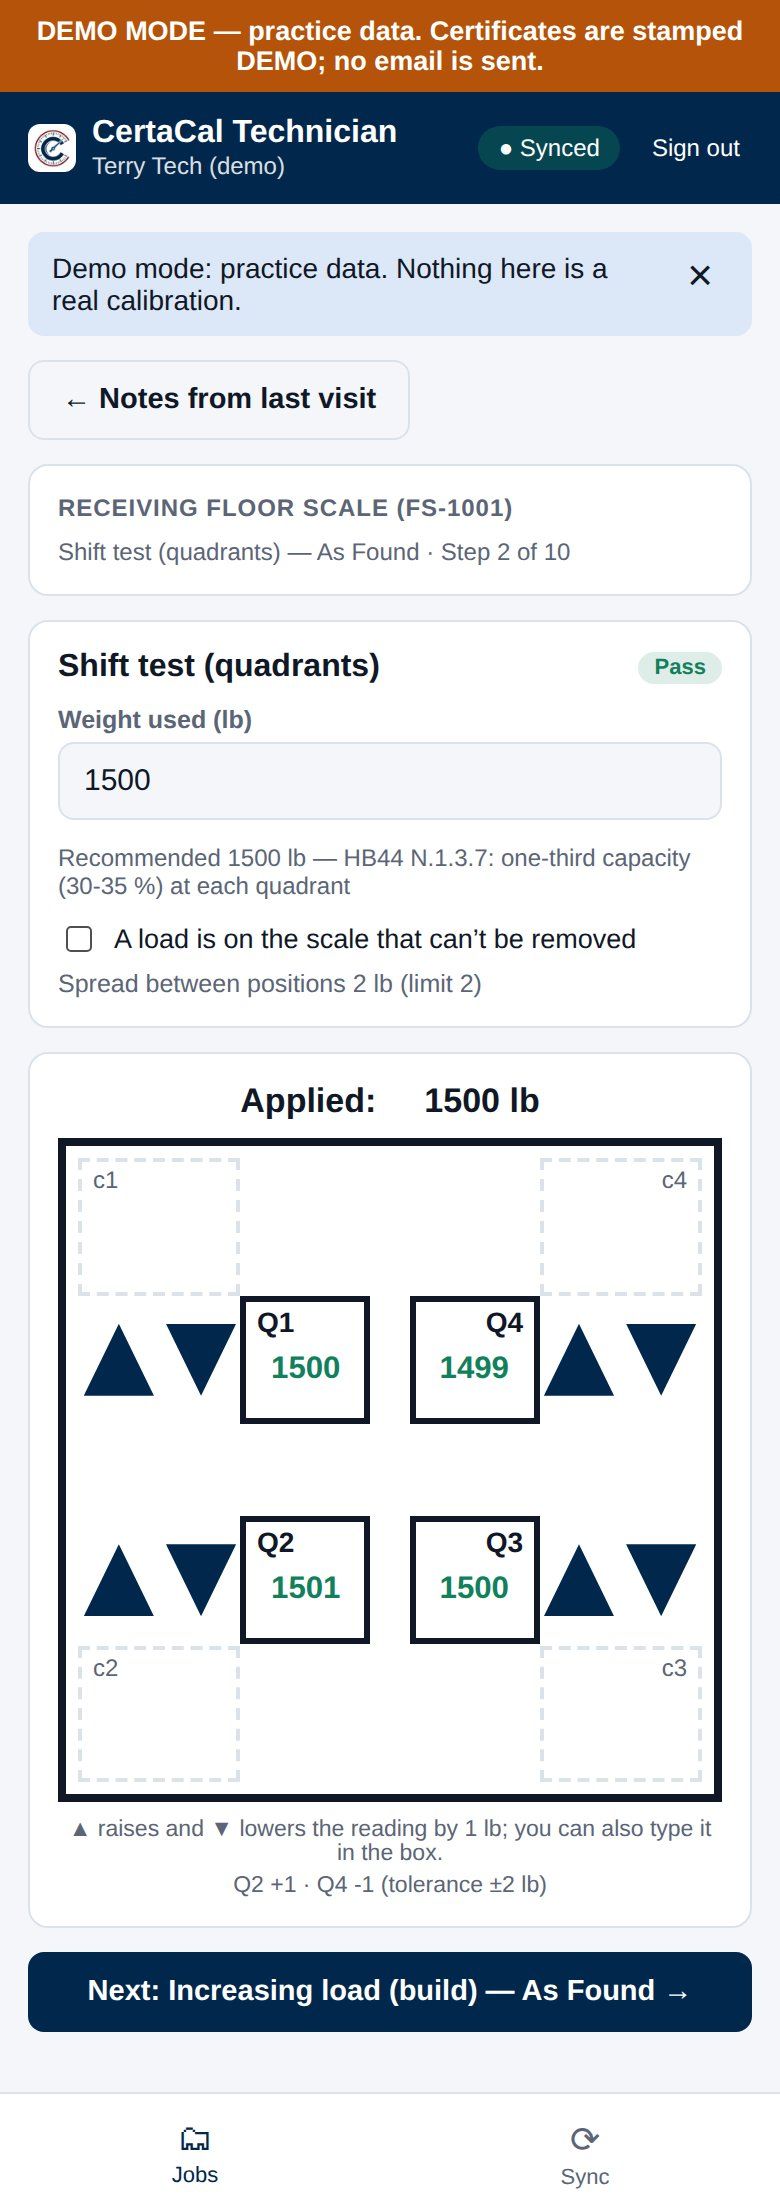
A load that can't be removed. If there's product or equipment on the scale that can't be taken off, tick A load is on the scale that can't be removed. Enter the reading with that load on as the reference, and add your test weights on top. The certificate notes it.
Strain or substitution load. On a build, drop, strain-load or substitution test, some of the load can be something other than your certified test weights: material, a vehicle, uncertified weights, or certified weights you're using off-class. Tick Strain or substitution load on that test, then:
- How you used it (build and drop tests): Under the test weights (strain load) when the load sits on the scale and you add your test weights on top; In place of test weights (substitution) when you brought material to the reading your test weights gave, then added the weights again.
- What it was: tap one. For Other, say what it was. A short description helps either way, for example "loaded truck" or "sand".
- For a strain load, enter Scale reads with the strain load alone. Your readings are measured from it, and the tolerance is for the test weights you added. How much is optional; leave it empty and the certificate gives the reading.
- For a substitution, the applied loads in the table are the running total, test weights plus substitute. Enter the Certified load it stands for: the test weights it replaced, in total. The tolerance is for the total load, and the certified part of your top load is what's checked against the minimum test weights.
This load is never a test weight. Don't tick it under Test weights used, even when it's certified weights used off-class: only your certified test weights are the reference. Shift and section tests don't offer it, because their one known load moves from place to place.
Zero return and similar single checks: remove the load and confirm the scale returns to zero.
Customer tolerances
Some devices are judged by a customer's tolerance instead of HB44 (for example Caltrans' ±2 d, or 1% of the load). The test card says Tolerance: and the rule when one applies; the pass or fail you see already uses it. On a legal-for-trade device HB44 still applies wherever it's tighter.
Adjusting
If As Found shows the scale out of tolerance, or close to it, adjust or repair it following the work instruction. You don't record adjusting in the app; the difference between As Found and As Left shows it.
As Left steps
After the As Found steps the app repeats the tests As Left, in the same layout (the applied weights are carried over from As Found). Enter the readings after your adjustment. If you adjusted the scale so it reads the test loads, tap Adjusted: every As Left reading on that test is set to its test load, and you change any that isn't exactly on with the arrows. If you didn't adjust anything, the readings are normally the same as As Found — still check each one against the indicator. As Left readings must be within the HB44 tolerance; the target is within 1 division of the applied load. If a reading passes but is more than 1 division off, the app says so: get it closer if you can, or say why in the notes.
Visual inspection
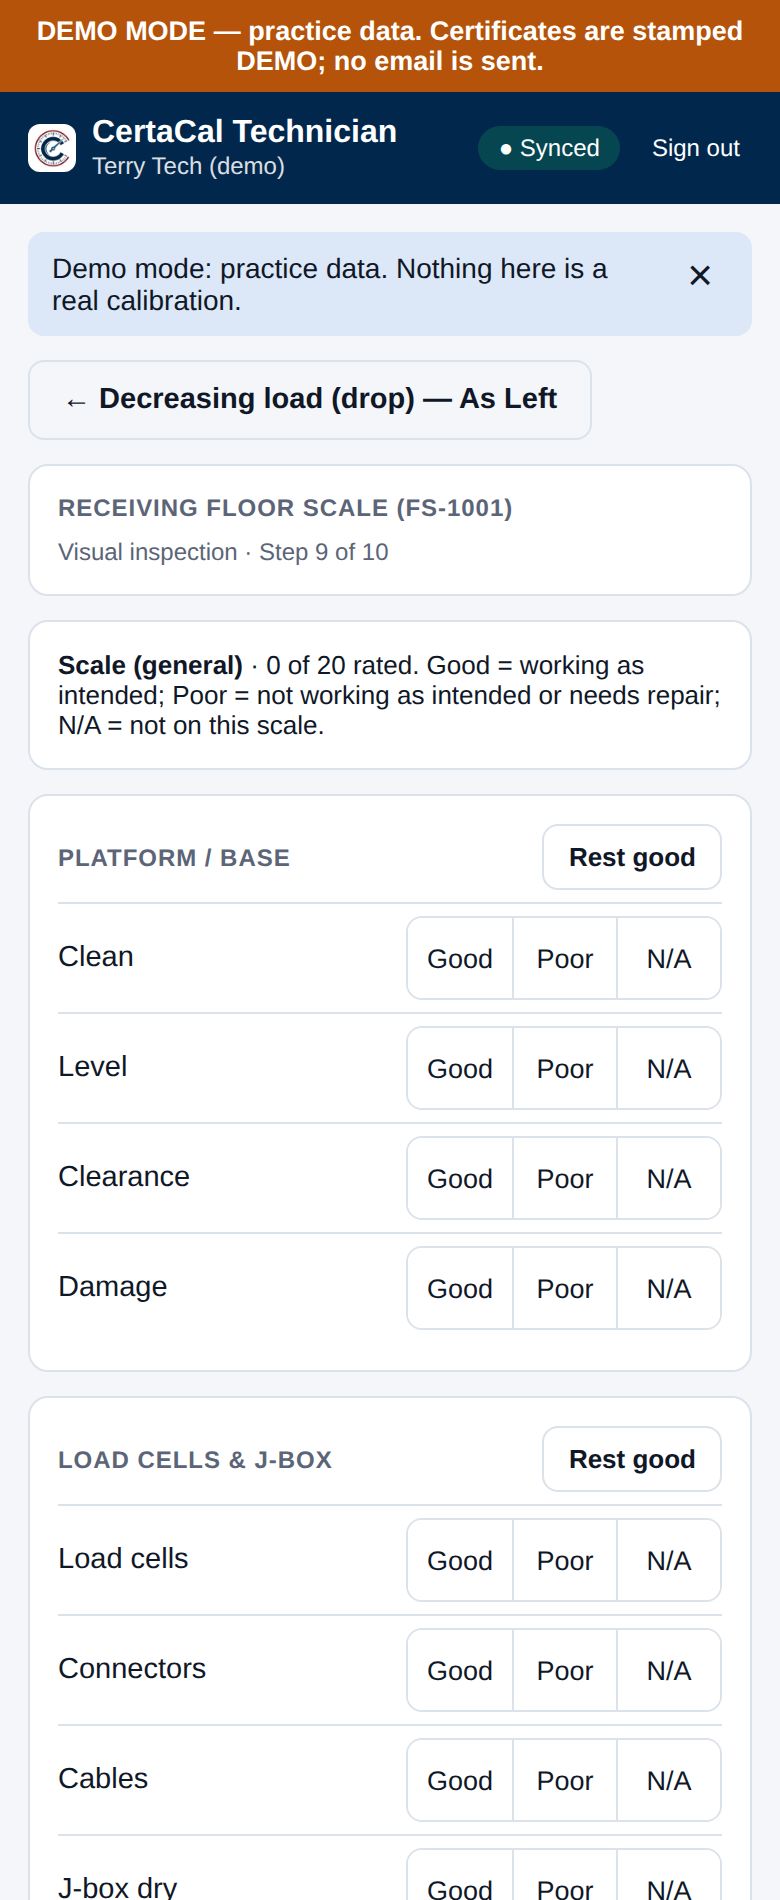
Rate each item on the checklist Good, Poor or N/A. Rest good marks every item left in a section as Good. Anything marked Poor is flagged for the reviewer and printed on the health report, so add a note saying what's wrong.
Finishing a scale
The procedure for each test
Once the office releases the company's procedures, a collapsed card at the top of each test shows Procedure for this test: the procedure it follows (one for the shift test, one for the build, and so on, plus one at the inspection). Tap it to read the steps; Open the full document shows the PDF when you have signal. The calibration records which procedure you followed, and the certificate names it.
Finish up
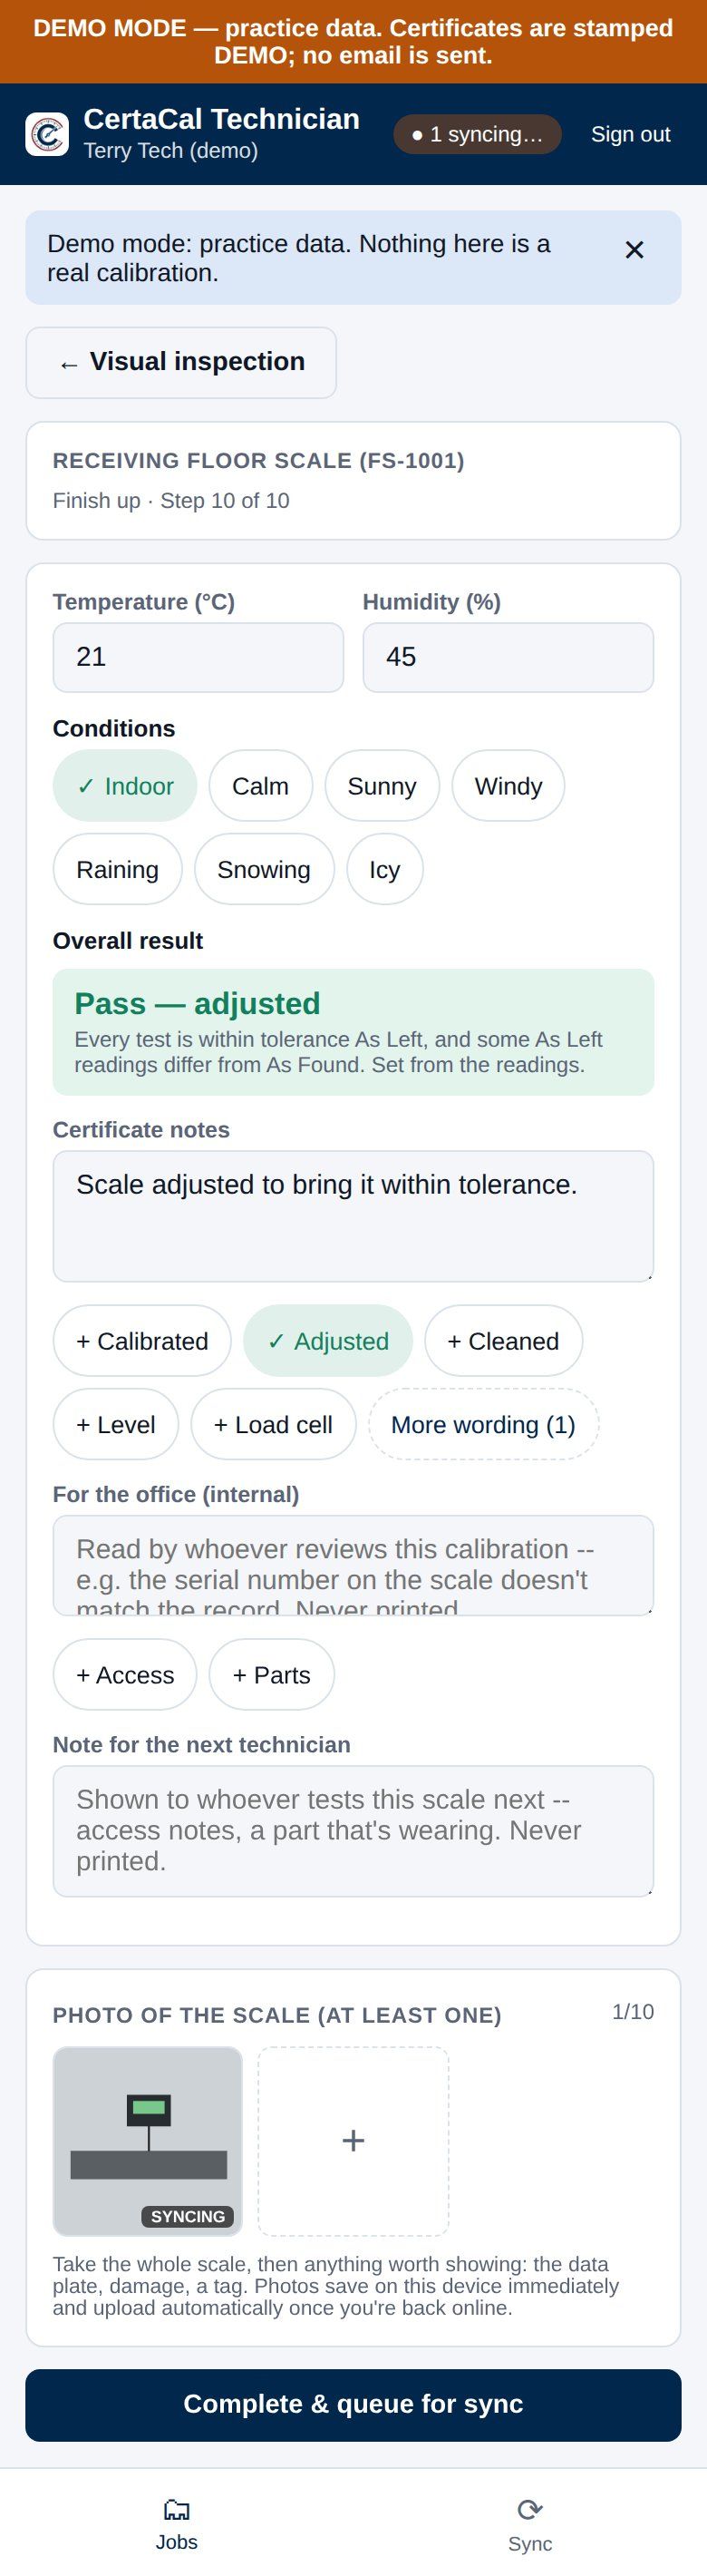
- Temperature and humidity. Enter them when you have them. Some scales require them; the label says required and the app won't let you finish without them. Temperatures are in °F; tap °C next to the label to enter them in Celsius instead. The phone remembers your choice for every temperature you type, and the certificate shows the same temperature either way.
- Conditions. Tap any that apply: Indoor, Calm, Sunny, Windy, Raining, Snowing, Icy (your office can change these words). Indoor and the outdoor weather choices cancel each other, so picking Indoor clears Windy and the like.
- Overall result. Worked out from your readings; you don't pick it. If anything is out of tolerance As Left, it's Fail. If it passes but the As Found readings don't match the As Left readings, the scale was adjusted: Pass — adjusted. Otherwise it's Pass. To change the result, change the readings that are wrong.
There are three kinds of notes. Put each thing in the right one:
| Box | Who reads it | Use it for |
|---|---|---|
| Certificate notes | The customer — printed on the certificate | What you did and found: "Cleaned debris from under platform. Adjusted span." Tap the ready-made phrases to insert them; More wording shows the rest. |
| For the office (internal) | The reviewer only. Never printed. | Record problems: the serial number doesn't match, the customer ID is wrong, a part needs quoting. |
| Note for the next technician | Whoever tests this scale next. Never printed. | Access notes, a part that's wearing, where the key is. |
Photo of the scale
At the bottom of Finish up, under Photo of the scale, tap + and take one: the whole scale first, then anything worth showing (the data plate, damage, a tag). You can add up to 10.
- (required: at least one): this scale, or your account, needs a photo. Submit stays grey until there is one.
- (optional, recommended): take one anyway. It counts toward the job's quality score and shows the customer the work.
- No photos: the customer doesn't allow cameras at its sites. The photo boxes are gone, including the tag photos a new scale normally needs; describe anything worth showing in the notes.
Tap Submit. The test data is now locked and the app goes back to the job's list of scales, where the scale shows 🔒 Syncing (or Locked · waiting to sync with no signal), then 🔒 Synced once the office has it. Tap it to see what you submitted, add photos or print its sticker.
Sticker and photos
After you complete a scale:
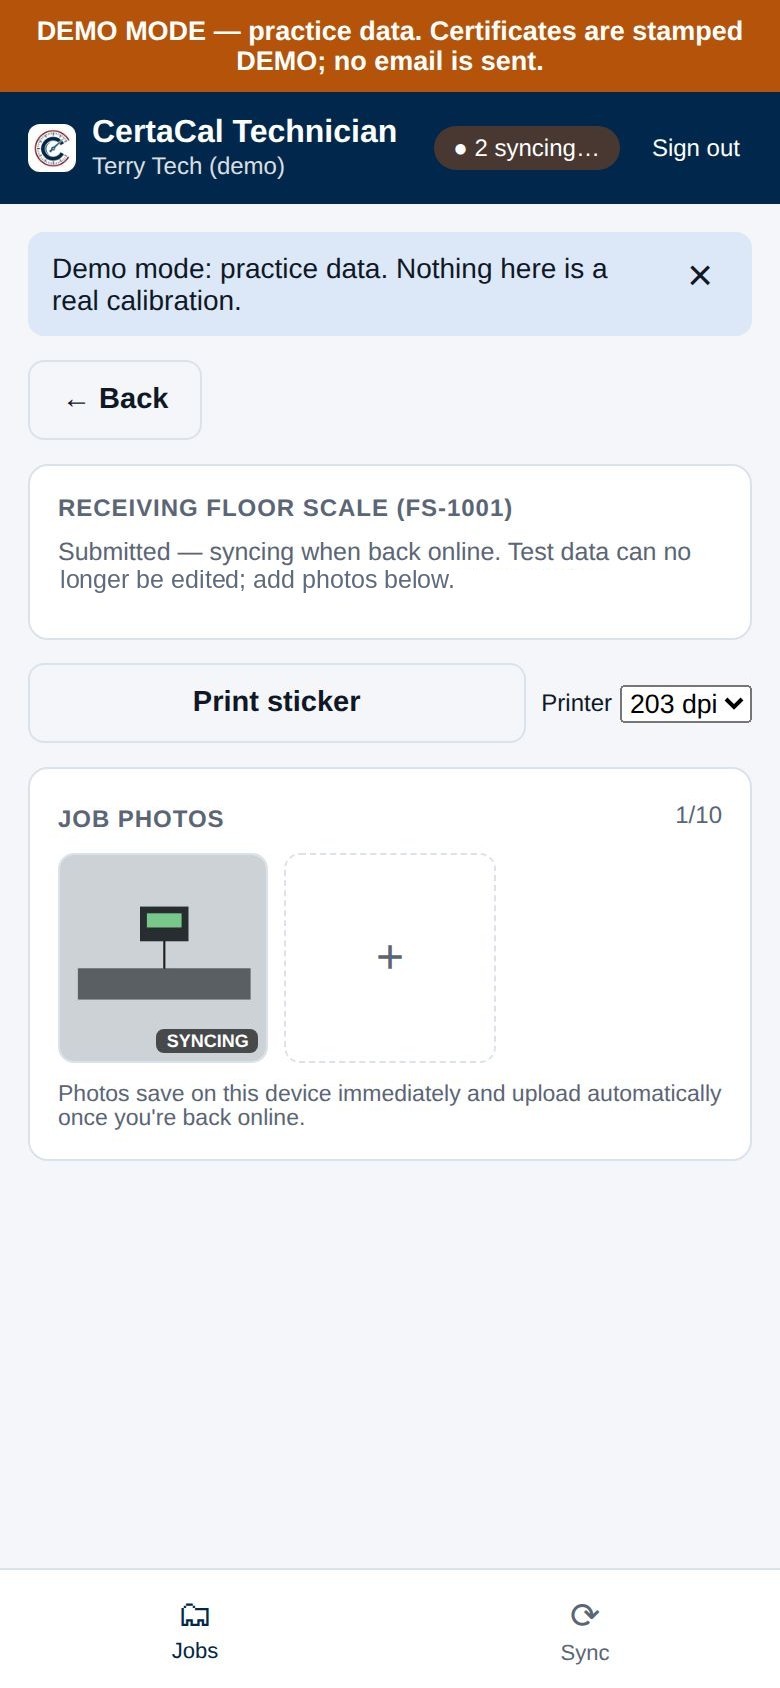
- Print sticker — prints the calibration sticker. The first time, pick your printer next to the button: a Zebra (its resolution, 203, 300 or 600 dpi), which prints straight away; Bluetooth printer (TSPL), a portable printer that prints straight from your phone; or Other label printer, which opens the phone's print dialog: choose your label printer there. The sticker is sized to your company's labels. If your company doesn't print stickers in the field, there's no sticker button and the office prints them. The sticker's QR code opens the scale's public page with its latest calibration. It works with no signal.
Setting up a Bluetooth printer. Bluetooth printers work in the CertaCal Android app and from Chrome on Android (version 137 or later); iPhones can't reach them from the app. The printer must speak TSPL, the language most portable label printers use.
- Charge the printer, load labels the size of your company's sticker (the office sets it in the sticker designer), and run the printer's own label calibration so it finds the gap between labels.
- Pair it in the phone's Bluetooth settings.
- In the app, next to Print sticker, pick Bluetooth printer (TSPL) and choose your printer from the list. The phone remembers it.
- Tap Test print. You should get a sample sticker with your company's header, Test print as the scale, and a QR code. If it says Open the app once with signal, then try again, do that: the app needs your company's sticker layout first.
If the printer has gone to sleep, the first print may fail: wake it and print again.
- Job photos — add more photos if you need to (up to 10 in all). They upload when you have signal.
You can also print stickers for every finished scale on the job at once from the job screen (Print stickers for finished scales).
Pre-printing: before you start (with signal), Pre-print stickers for every device on the job screen prints a sticker for every device on the job at once, so you can put each one on as you finish that scale. They're dated the job's day with each device's due date, in the name and license of the technician the job is assigned to, with no QR code. Tick Print a spare of each to get two of each: a spare covers a sticker that goes on badly, or can be left with the customer to replace a damaged one. A spare is dated and made out to one device, so it can't go on anything else. The office can also pre-print them from the job on the Jobs board.
You don't sign each scale: you sign once for the whole job when you finish it (next section).
Asking for a quote
When a scale needs a repair (or the customer wants work that isn't on the job), ask the office for a quote while you're there:
- On the job, tap Request a quote under the scale, or Request a quote for this visit at the bottom.
- Pick A repair or A calibration and say what it needs.
- Add photos if they help.
- Add the parts: pick one from your company's materials list (its price fills in) or type it, with the part number, how many and the price each. Every part needs its price; the app won't send one without it.
- Tap Send to the office.
It saves on the phone and goes when you have signal, like your calibrations. The office checks your parts, adds the time and travel, and sends the customer the quote.
If the office's server turns a request down (for example it isn't your visit, or a part has no price), the job shows it under Quote requests that didn't go, with the reason. Tap Fix and send again to change it (your photos are kept) and send it, or Throw away.
Customer Service Report
If your company uses them, the job screen has a Customer Service Report card. Tap it to open it.
- Times: tap Leaving for the job when you set off, Arrived on site, Leaving the site and Back. Each tap stamps the time, even with no signal. Tap a time to correct it.
- Miles, if your company records mileage: under your times (Miles driven), or once for the visit (Mileage for the visit) when the crew shares a truck. Some companies ask for the Odometer start and Odometer end instead; the app shows the miles they come to. A figure that looks too high asks you to check it, but you can keep it if it's right. Like the rest of the report it saves on the phone and goes when you have signal. After you finish the job only the office can change the miles.
- PO #, the check list, Recommendations and Quoted (with the quote #), Work accomplished (the scales you did are listed on the report by themselves; add anything else), Parts (quantity, description, price each) and Job status.
- On a job from a time-and-materials quote, the card shows the quote's estimate, and the quoted parts are already listed: change them to what you used, and give every part its price, because the invoice bills them.
- Billing, if your company uses it: the vehicle zone and the hours (regular, overtime, double time) and any miscellaneous charge. For a customer on a service agreement the office fills this in, so it's greyed out.
Everything saves on the phone as you go and goes to the office when you have signal. Finish this job sends anything still waiting first. The report prints with your signature for the job and the customer's; the customer's copy has no prices or billing.
A manufacturer's service ticket
A job a manufacturer sends can carry its service ticket. On the job screen, tap the ticket's card:
- At the top is what the manufacturer sent: the asset, the failure reported, special instructions, and any parts it has pre-authorized. Read the special instructions before you start.
- Fill in the rest: failure found, service performed, the checks, times and mileage. Some sections show only for some jobs, such as a forklift scale's checks.
- Parts: parts stay locked until you tick that the manufacturer's service desk approved them and type who approved it (and any reference), unless the manufacturer pre-authorized parts for the job. Call them first.
- It saves on the phone as you go and goes to the office when you have signal.
You can't finish the job until the ticket is filled in, and the customer's contact signs when you finish. The calibration results, their signature and your name are added to the ticket for you.
Finishing the job
A job you didn't finish on its day stays at the top of your list, marked Needs finishing. Finish it, or tell the office if it needs another day.
When every scale on the job is done (or marked N/A), tap Finish this job at the bottom of the job screen.
- If some scales are still syncing, the app waits for them and tells you if any haven't gone yet.
- If tasks on the job aren't ticked, you're asked whether to finish anyway, or told to tick them first if your company requires it.
- Then sign for the job with your finger and tap Use this signature. One signature covers every scale on the job; it prints on the customer's equipment health report and on each certificate. Sign again redoes it.
- If your company asks for it, the customer reads the acknowledgement ("I acknowledge that the equipment listed was serviced on this date and the results were reviewed with me."), types their name and signs. When it's marked (optional) you can skip it; when it isn't, the job can't be finished without it.
- Tap Sign and finish the job. You need signal for this. Not yet goes back to the job without finishing it.
- Finishing sends any placed-in-service reports for legal-for-trade scales on the job.
- If the office sends scales back and you finish the job again, you aren't asked to sign again.
- The job then shows Completed — waiting for the office to review.
Work sent back to you
If a reviewer returns a scale, it shows on the job in red: Returned by the office, with their comment, and a Redo badge. Tap it and test it again. Your new calibration replaces the returned one, and keeps the photos from the first try.
Fixing a mistake before you finish the job
Made a mistake on a scale you already completed? Until you finish the job, tap Reopen next to the scale's 🔒 Synced badge, say what was wrong (optional) and tap Reopen again. The scale opens again with what you entered (when it was entered on this phone), so you only fix the mistake, then complete it again. You need signal for this.
The office can also send a scale back while you're still on the job, from its In progress page. After you finish the job only the office can send a scale back, and that usually means coming back to the site, so check your work before you tap Finish this job.
How your work is scored
Every scale you complete is given a quality score out of 100 by CertaCal itself, worked out from what you recorded. Nobody types it in. The office sees each scale's score and the job's average, and a reviewer audits a sample of your scales against it. Four things count, 25 points each:
| Line | Full marks when… | What loses points |
|---|---|---|
| Tests done as the scale's setup asks | Every test switched on for the scale was recorded. | A test left out. |
| Readings hold together | The readings look like real readings and add up. | Readings that look copied (−15); a scale left further off than the company's As Left target with no note (−5 each, up to −10; the target is usually 1 division); a test load below the recommended load, or a section test load above the base's CLC (−5); Adjusted or Fail with no note saying what was done (−5). |
| Record complete | Photo, weights, inspection, signature and conditions are all there. | No photo (7); test weights not picked (6); weights not on a current certificate (4); no visual inspection (4); not signed (2); temperature and humidity missing on a scale that asks for them (2). |
| Scale details complete | The scale's serial number, manufacturer, model, capacity, division and location are on file, and the CoC numbers on a legal-for-trade scale. | Each one missing. |
The job's score is the average of its scales. The office needs the job to average at least 80% (the company can set a different minimum) to approve it. One weak scale doesn't sink a job: one scale at 50% and three at 100% average 87.5%, and the job passes. But every scale that scores under 80% is always among those the reviewer checks by hand.
If the job averages under 80%, the reviewer sends the low-scoring scales back to you. Each one comes back as Redo with the score and what CertaCal found ("Quality score 55%: No photo; Not signed").
Special cases
When you can't test a scale (N/A)
On step 1, tap Can't inspect this scale (N/A) and pick why:
- Out of service
- Waiting on repair
- Decommissioned
- Missing — not on site
- No access (in use, locked, unsafe)
- Other (describe it)
Add a note for the customer's report, and a note for the office if needed. No certificate or sticker is made; the scale stays due. The office decides whether to change the scale's status.
Troubleshooting a scale
When a scale has a fault to find (it won't zero, drifts, reads wrong in one corner, shows an error), fill in its troubleshooting report on the job. On the job, tap Troubleshoot under the scale. It saves on the phone and goes to the office through the sync light like everything else, so it works with no signal.
- Header: the date, the customer's contact, the system ID and the scale type (filled in from the scale; change them if needed).
- System diagnostics: the six checks in order. Step 1 is what the operator told you: when it started, what changed, what they tried. It's required. Mark steps 2 to 6 Pass, Fail or N/A, with a note on any action or repair. None can be left blank.
- Load cell diagnostics: enter the cells' rated output (mV/V) and the excitation, specified and measured. Tap + Add load cell for each cell you test, and enter its capacity (required; a new cell starts with the last one's), zero balance, input and output resistance, the two cross legs, insulation (MΩ, or nS on a conductance meter) and the shock test. Tick Cable spliced if it is. Each cell shows Pass, Suspect or Fail as you type, and the reading that failed turns red:
- Conclusion: tick the diagnosis (single or multiple component failure, saying which; bind or shunt; moisture; lightning or surge; or describe another), list the parts replaced, and tick Waiting on parts if you couldn't finish the repair.
- Final verification isn't typed in: it comes from the scale's calibration on this visit. Calibrate the scale after the repair as usual (repeatability and shift tests included), unless it's waiting on parts.
- Sign-off: type your name to sign, and the customer's representative and email.
• Dead load is worked out for you from the zero balance and the cell's capacity: the weight the reading says is sitting on the cell.
• Zero balance more than 10% of full-scale output fails. If the dead load is high for a reason (a motor or other equipment mounted over that cell), tick Dead load acceptable and say why; the cell then isn't failed for it.
• The cells' dead loads should match: a cell whose dead load is more than 20% away from the other cells' is suspect (a high or low cell), unless you've marked its dead load acceptable.
• An open (enter OL) or shorted (under 1 Ω, unless your company set another limit) leg.
• Cross legs more than 0.5% of the output resistance apart.
• Insulation under 1,000 MΩ fails; 1,000 to 3,000 MΩ is suspect. On nS, over 1.0 fails and over 0.333 is suspect.
• A failed shock test. A spliced cable is suspect.
These are CertaCal's starting limits. Your company can set its own, and the app shows the ones in force under the excitation. It keeps them for when you have no signal. The office's copy and the printed report are judged by the same limits.
Save draft keeps it on the phone to finish later. Complete report checks nothing required is missing and sends it. A completed report is locked; if it needs to change, ask the office to reopen it. You can't finish the job while a report is still a draft.
Weight sets
A weight set has one step for all its weights instead of the scale tests. The work instruction card at the top shows your company's weight calibration procedure, if the office has added it: typically acclimation, cleaning, the balance check and the substitution cycle.
- At the balance, enter the Balance / comparator ID and the barometric pressure (hPa), and choose mg or g. Everything you enter for the set is in that unit.
- Every weight needs its expanded uncertainty U (k=2). Type it once under Same uncertainty for every weight and tap Fill blanks, or enter it weight by weight.
- For each weight, enter its As Found correction: its conventional mass minus its nominal value, from the substitution. If you adjusted it, enter the As Left correction too; otherwise leave As Left blank.
- Each weight shows Pass, Fail or No statement as you type, by this rule: it passes when its correction plus U is within the tolerance and fails when its correction minus U is outside it. In between, or when U is more than a third of the tolerance, no pass/fail is stated. A weight with no tolerance on file says so; the office sets it.
- Under Finish up, the room temperature and humidity are required, and pick the standards you used. Take a photo of the set unless the customer allows no photos.
- Keep the balance readings, check standard and air density on your company's worksheet and file it as your procedure says.
A weight that fails is reported as failed; the rest of the set still passes. To calibrate only some weights (a repaired or replacement weight), leave the others blank: they stay off the certificate.
Thermometers and other measuring devices
A device that isn't a scale (a thermometer, a gauge, a hygrometer) has readings against a reference, not test loads. Its tests show Reference and Reading columns in the device's own unit (°F or °C for a thermometer), and its tolerance comes from the device's tolerance rule or the manufacturer's specification, never HB44.
- Under Reference standards used, tick the reference you compared it against: the reference thermometer (and its bath or block) or the reference instrument. It's printed as the traceability on the certificate.
- The scale parts of the form don't appear: no test weight kits, no CoC or legal-for-trade questions, no static load.
- A new device found on the job asks for its range (or full scale), resolution and unit instead of capacity, division and accuracy class, and only its serial tag or data plate and where it is are photographed.
Thermometers
A thermometer has an Ice-point check step before its readings.
- Check the reference first. Pack finely crushed ice to the bottom of an insulated container, add cold distilled water until the ice is saturated but not floating, let it settle 5 minutes and stir. Put the reference thermometer's tip 4 to 6 in (10 to 15 cm) down. Pick the reference, then enter its reading, and from its certificate the correction at the ice point and its uncertainty. It passes when the corrected reading is within that uncertainty plus 0.1 °C (0.18 °F) of 0 °C (32 °F).
- If the reference fails, take it out of use and tell the office. Don't tick it under Reference standards used: tap Add another reference, check the one you'll use instead, and carry on with that. The calibration can't be sent with a reference that failed.
- Once per job. The check carries over to the next thermometer you open on the same job; change it if you check again.
- Each test point has a kind and a label: Ice point, Boiling point or Other point, and a label that prints on the certificate ("Ice point", "Process 165 °F"). Test the device side by side with the reference, and enter the reference's corrected reading as the Reference value.
- A boiling point needs the site's altitude (ft or m). If you have a barometer, enter the station pressure where you are (not the sea-level figure a weather report gives). If you measured the local boiling point another way, enter it instead. The form shows the boiling point expected there (212 °F at sea level, about 1 °F lower for every 500 ft) and fills it in as the reference value until you type the reference's own reading. If the reference is more than about 1 °F (0.5 °C) from the expected value, the reference or the bath is suspect: stop and look into it.
- The device is judged against the reference value, never against the nominal 32 °F or 212 °F. The reviewer sees a missing ice-point check, a reference that failed it, and a boiling point far from the expected value.
Viscometers
A viscometer is checked with certified viscosity standards, and has a Readings step in place of the tests. Hold each standard within 0.1 °C of its certified temperature in a 600 mL low-form beaker, with the guard leg on.
- For each reading, pick the Standard. The list shows each standard with its lot and certified value, for example VS-500-01 — 500 cP at 25.0 °C. Its certified value becomes the reference.
- Enter the Spindle, Speed (rpm), % torque, the Full scale for that spindle and speed, and the Sample temp (°C), then the reading As Found.
- Test every spindle the customer uses at about 20 %, 50 % and 90 % torque. A reading under 10 % torque isn't judged: change the speed or spindle and take it again.
- Tap + 3 repeat readings for repeatability: take the middle reading three times, lifting the spindle out and immersing it again each time.
- If it was adjusted or repaired, tick It was adjusted or repaired and enter the As Left readings.
Each reading shows its error and tolerance as you type: ±1 % of the full scale for that spindle and speed (or the device's tolerance rule), plus the standard's own tolerance. CertaCal judges the readings again when the record syncs. The standards you pick are added to the standards used.
Hygrometers
A hygrometer (or thermo-hygrometer, or a data logger with an RH channel) is compared with a calibrated reference hygrometer in a humidity source, and has a Readings step in place of the tests. Let the device, the reference and the source settle at the same temperature for at least 30 minutes, away from drafts, sun and heaters: 1 °C between probe and source moves the RH by about 3 %RH. Don't clean a dirty filter before the As Found readings.
- Pick the Reference hygrometer and whether you record temperatures in °C or °F.
- The step starts with three points, about 33, 53 and 75 %RH (magnesium chloride, magnesium nitrate and sodium chloride salts). Add a point with + Point (for example potassium chloride, about 85 %RH, for a device used above 75 %RH, or a point in the band the customer uses). Go from low to high.
- For each point, choose the Source: a saturated salt (and which salt), a humidity generator or a chamber (with its set point). Enter the Source temp.
- Put both probes in the source together, seal it and wait until both are steady (30 to 60 minutes in a salt cell). At the same moment, enter the Reference reading, its correction from its certificate, and the device's reading As Found.
- For a thermo-hygrometer, tick It has a temperature channel and enter the reference's and the device's temperatures at each point.
- If you adjust it or clean or replace its filter (only with the customer's OK), tick the box and enter As Left readings at every point.
Each point shows the reference value (the reference's reading plus its correction), the error and, when the device has an RH tolerance on file, Pass or Fail. A device with no RH tolerance is reported with its errors and no statement of conformity. A salt's value only names the point: the reference hygrometer is what the reading is traced to. Lithium chloride isn't used below 18 °C. CertaCal judges the readings again when the record syncs.
Moisture analyzers
A moisture analyzer (moisture balance) is a balance with a heater. It has the scale's weighing test first, then a Heating check step. The analyzer must be level, switched on for an hour, and its heater cold for an hour before you start.
- Weighing: remove the sample pan, tare, and put one certified weight of 50 % to 100 % of capacity on the pan support (for example 50 g or 100 g; your company may set a higher minimum, and the suggested load follows it). Record it as the build test. Where the customer also uses it as a balance, the office turns on the other scale tests. The limit is the device's tolerance rule (the manufacturer's), or ±0.05 % of the test load when there's none. If it's out, adjust it with its calibration routine and the certified weight, then enter As Left.
- Heating: fit the manufacturer's temperature kit in the sample position, and pick the Temperature kit and enter its correction from its certificate. Run the analyzer's temperature test at the two set temperatures (normally 100 °C and 160 °C) and enter what the kit reads after the manufacturer's time. Each point shows the actual temperature (reading plus correction) and its deviation. Past the warning limit, let it cool, run it again and enter the Repeat. Past the control limit, or the warning limit twice, adjust the temperature with the kit (only once the weighing has passed), tick the box, and enter the As Left readings and what you adjusted.
- Reference substance (troubleshooting only): it isn't part of a routine calibration. When you're troubleshooting a customer's results, tick Troubleshooting: add a reference-substance check after both tests pass, pick the substance and lot (for example sodium tartrate dihydrate) and enter the sample mass, the drying settings and the result. Never adjust the analyzer to the substance: if it's outside its limits, check the sample handling, the pan and the heater glass, clean, and enter the result After cleaning. If it still fails, tell the customer and recommend manufacturer service.
The heating limits are the manufacturer's, set on the device by the office; with none on file, ±3 °C applies. The analyzer passes when the weighing and heating tests pass. A reference-substance check, when one was done, is reported on the certificate but doesn't decide the result. CertaCal works out the result when the record syncs.
Flow meters
A liquid flow meter is tested with test drafts: deliveries through the meter into a reference, a prover or test measure, a master meter, or a container on a scale. Its step is Test drafts, in place of the scale tests.
- Under The meter, choose its Use: Commercial when the customer sells or bills by volume, Industrial / process otherwise. Enter the code and accuracy class (commercial) or the specification you test to (industrial), the Product, and the meter factor or K-factor As Found before you change anything. Pick the flow rate and temperature units once for every draft.
- For each draft, choose the Test (normal, special slow-flow, repeatability or a flow point), the Reference and its Standard, then enter the Flow rate, the product temperature at the meter and at the reference, the volume Delivered and what the Meter shows. Tick Temperature compensation on when the draft ran with compensation.
- Enter the delivered volume already corrected: for a prover, for its own expansion and, on a meter without compensation, for the product's expansion; for a scale, the net mass with the buoyancy correction, divided by the product's density at its temperature. With a scale, also enter the net mass and density for the record.
- A commercial meter needs the normal test, the special test and at least three repeatability drafts of about the same size (+ 3 repeatability drafts). An industrial meter needs three drafts at each flow rate the process uses.
- If you adjust the meter, do it only with the customer's OK. Tick It was adjusted: As Left drafts are added for you to run the test plan again. Enter the meter factor As Left and the Seals / audit counters after sealing. Drafts run after an adjustment are never As Found.
- Enter the Expanded uncertainty U in % if your procedure gives one.
Each draft shows its error as a percentage of the volume delivered, and its tolerance from the meter's tolerance rule. A positive error means the meter over-registers. On a commercial meter, the repeatability drafts' errors must also agree within 40 % of the tolerance. A meter with no tolerance on file is recorded with no pass or fail; the office adds the rule. CertaCal judges the drafts again when the record syncs: Pass, Adjusted (As Left drafts run and passing) or Fail.
Pipettes, burettes and glassware
A pipette, burette, volumetric flask or measuring cylinder is calibrated by weighing the water it delivers (CP-520): ISO 8655-6 for a piston pipette or burette, ISO 4787 for glassware. Its step is Weighings. Let the instrument, tips and water stand in the room for at least 2 hours first.
- Under Before the first reading, enter the Air temp, Pressure and Humidity, and pick the Balance. The readings stay locked until all four are in: CertaCal needs them for the air density.
- The test plan is filled in for you from the test catalog: a piston pipette at 10 %, 50 % and 100 % of its nominal volume, 10 readings at each; glassware at its nominal volume, 10 readings.
- For each delivery, enter the Balance reading (mg for a µL instrument, g for a mL one) and the Water temperature. Pre-wet each new tip five times. For a flask or cylinder adjusted to contain, enter the filled weight less the empty weight.
- Each reading shows its volume at 20 °C (V₂₀). Under each volume you see the mean, the systematic error (mean minus the test volume), the random error (the standard deviation s and CV) and the limits they're judged by. + Reading adds one more.
- If you adjust it, tick Adjusted: test again As Left and weigh the whole plan again.
A piston instrument passes when, at every volume, both errors are within their limits; glassware when its systematic error is (its standard deviation is reported, not judged). The limits are the manufacturer's on the instrument's record, else your company's tolerance table. With neither, the results are recorded with no pass or fail. CertaCal works it out again when the record syncs.
Calipers and micrometers
A caliper, micrometer or height gauge is checked against gauge blocks, ring gauges or other length standards. Its step is Readings. Let the instrument and blocks reach the same temperature first, and handle blocks with gloves or by their ends.
- Enter the Instrument temp and Block temp in °C. Results are referenced to 20 °C; what matters most is that the two are the same. A difference over 1 °C is flagged for the office.
- Pick the standard under Standard for every reading to fill it in on every row, and enter the expanded uncertainty U if your procedure gives one.
- Check Zero first. Then measure:
- For each reading enter the Block / stack used, its Reference value and the reading As Found, as displayed.
- If you adjust it, tick It was adjusted, say what you adjusted (from and to), and enter every reading As Left.
• a caliper: outside jaws at five or more points across its range (the suggested sizes are shown in the Reference box), once more near the jaw tips at one point (tick Measured near the jaw tips), then the inside jaws and the depth rod where it has them;
• a micrometer: points that turn the thimble to different positions, as suggested. Record anvil flatness and parallelism in interference bands where the specification asks for them.
Each reading shows its error (reading minus reference) and its tolerance from the instrument's tolerance rule, the manufacturer's specification or the customer's tolerance as the office entered it. With no tolerance on file it's recorded with no pass or fail. CertaCal judges the readings again when the record syncs.
Metal detectors
A metal detector has no readings and no tolerance. It passes when every test piece the customer requires is detected and rejected at all nine positions in the aperture. Its step is Test pieces, in place of the scale tests.
- Under The line, enter the belt speed, the reject method, the product or program number, and the customer's quality contact.
- Under Test pieces, add each piece the customer's plan requires: metal (Fe, NFe or SS), diameter in mm as printed on the piece, its ID, and whether it is ours or the customer's. Leave Customer requires ticked. If the customer sets no sizes, untick it on every piece. The report then gives the smallest piece of each metal detected, with no pass or fail.
- Under As Found, run each piece on its own at production speed. For each of the nine positions (A1–A3 on the belt, A4–A6 at mid-height, A7–A9 at the top), tap once for detected and rejected, again for not detected, and a third time for not rejected. All 9 passed fills a piece's row.
- Under Fail-safes, add the ones the line has and mark each Pass, Fail or N/A.
- If you adjust the detector, do it only with the customer's OK. Tick I adjusted it, record each setting you changed (from and to), and run the pieces again under As Left.
- If anything fails, a red card asks who you told at the customer and when. Tell them straight away: product made since their last good check may be affected. You can't finish the detector without this.
CertaCal decides the result when the record syncs: Pass, Adjusted (failed As Found, passed As Left) or Fail. The customer gets a Metal Detector Verification Report showing every position tested.
Magnets
A magnetic separator (grate, drawer, tube, plate, pneumatic line, cross-belt, head pulley or drum magnet) is validated, not calibrated: its Gauss and pull results are compared with the customer's minimums. Its step is Gauss and pull, in place of the scale tests. Lock out the conveyor before going near a cross-belt, drum or head pulley magnet, bring one test piece at a time, and stay out of the pull line.
- Under The magnet, pick its type, construction and application (Final product or Plant protection), and enter where it is in the process. Measure the surface temperature: above 60 °C (140 °F), or the limit your company set, tell the customer and let it cool. The card shows the limit. If you enter its rated operating temperature and it's hotter than that, the result is marked conditional. Test an electromagnet energized, and record the voltage and current.
- Under Instruments and checks, pick the gauss meter, reference magnet, force gauge and check weight from your standards. Check the meter on the reference magnet and the force gauge with the check weight (within ±2 %). An instrument that fails its check is out of service: CertaCal won't take results from it. The instruments and start checks carry over to the next magnet you test that day. On the last magnet of the job, enter the force gauge's end of job reading; if it's outside ±2 %, every result from the job is suspect.
- Under Condition, describe the magnet before and after cleaning, and tick the box for cracks, weld separation, significant pitting or exposed core. Take photos before and after cleaning.
- Under Control limits, enter the customer's minimum Gauss and minimum pull and say where they come from (the customer's control limit, the manufacturer's rated minimum, the baseline, or a published value you name). Leave a minimum blank when there's none: that reading is reported for trending. For a final-product magnet under HACCP International MAGSEP, tick MAGSEP: it's judged on Gauss, so the minimum Gauss is required. Enter the baseline Gauss and pull if the customer has them.
- Under Gauss and pull, pick the probe, the pull unit, the test piece and any spacer (the card suggests the test piece for the type). Use the same test piece on the same magnet every visit. Add each tube or element: its peak Gauss and where the peak was, then the five pulls. CertaCal sets the highest and lowest aside and reports the mean of the other three. Tick The piece slid if it slid or reattached elsewhere.
- If the magnet fails, a red card asks for the out-of-service tag number, who you told and when. Only the customer can decide to keep it in use; if they do, record who decided.
- Pick the recommended interval and enter the customer representative's name.
CertaCal decides the result when the record syncs: Pass when the lowest Gauss reading and the lowest breakaway force each reach their minimum, Fail otherwise. With no minimum at all, the results are reported with no pass or fail. The customer gets a Magnet Validation Report showing every element and every pull.
Scale types and tests you don't recognise
Each scale's tests come from the office's setup. If the list doesn't match the scale in front of you (for example, a truck scale set up as a floor scale), test what you can, and explain in For the office (internal). The office fixes the setup.
A scale that isn't on the job
You find a scale at the site that isn't on your job, or it's a first visit to a new customer and the office scheduled the job with no scales on it. Add each scale so you can test it today:
- On the job screen, tap + Found a scale that isn't on this job.
- Enter its name (what the customer calls it), type, manufacturer, model, serial number, the customer's ID if it has one, where it is, capacity, division and accuracy class.
- Serial tag photos show once you've picked the type: photograph each tag straight on, close enough to read. The indicator's tag; the base's for a scale on a separate base; for a tank or hopper (load cells), the junction box's tag and one load cell's tag. If your company has AI reading set up, tap Read the tags: it fills in the make, model, serial number, capacity, division, class and CoC numbers that are still empty and lists what it filled. Check every value against the tag: the AI can misread a worn plate. Anything it couldn't read is listed; type those. Without AI reading, type the details as usual: the photos go to the office either way.
- Pick How it's built. It starts on what's usual for the type you picked:
- Tick Used for commercial trade if it's legal for trade. Enter the CoC number from the data plate whenever it has one, legal for trade or not.
- Tap Add … to this job. The tag photos go with it.
• Single unit: one device with no separate base, such as a balance or a bench scale built as one. Nothing is asked about a base.
• Indicator and base: enter the base's manufacturer, model, serial number and its own CoC number. On a vehicle or axle-load scale, also enter the CLC (concentrated load capacity) from the base's data plate, in the scale's unit; Read the tags fills it in when it's empty. The section test load is kept at or under it, and a load above it gets a warning (it's still allowed and noted on the record).
• Load cells: a tank, hopper or vessel. Enter the junction box's serial number (or tick No serial number, or can't read it), the number of load cells, one cell's capacity, the cells' manufacturer and model, each cell's serial number (tick Can't read for an old cell whose label is gone) and the cells' CoC. The scale's capacity is worked out as the number of cells times one cell's capacity.
The scale is added to the job marked Added in the field — the office checks it before its certificate goes out. Test it as normal.
Before you can complete it, the last step asks for photos for the office, one in each box. If your company only recommends them, the card says so and you can complete without them (take them if you can: the office checks the scale against them). If your company doesn't ask for them, the card isn't there, and neither are the tag photos when you add the scale.
- Indicator serial tag: the data plate on the indicator, readable.
- Base serial tag: the data plate on the base or platform. Not asked for a complete unit.
- Junction box serial tag and Load cell serial tag: for a tank or hopper on load cells (no junction box tag when you ticked that it has none).
Tags you photographed when you added the scale show as (taken) and aren't asked for again.
- Where it is: enough of the area that the next technician can find it.
- The device (optional): the whole scale.
Tap a box to take its photo, or to retake it. These count as the scale's photo too. The office either accepts it as a new scale or, if it's one they already have under another name, merges it into that record. Its certificate is issued only after that.
New scales already on your job
A scale can also arrive on your job as a New scale (yellow line), for example one the office booked in ERPNext that CertaCal didn't have yet. Tap Scale details under it: what's known is filled in. Check it against the data plates, fill in what's missing (type, class, division, capacity, base or complete unit, legal for trade and CoC number) and tap Save the scale details. Then test it as normal; when you finish it, photograph its serial tags (indicator, and base or junction box and a load cell) and where it is. The office checks it before its certificate goes out.
Correcting a scale that's already on record
When what's on record doesn't match the scale in front of you (a wrong serial number, a different model, a division or capacity that's been reprogrammed, a replaced indicator), tap Correct scale details under the scale on the job. Change what's wrong and say why in Why are you changing it?: the change can't be sent without it. Tap Send the change to the office. It works with no signal; it goes when you have signal again.
Your company chooses what each detail does. Most wait for the office, as below. Some may apply at once: they change on the record as soon as the change sends. A greyed-out detail isn't changed from the field: if it's wrong, write what it should be in the calibration's notes for the office. Capacity, division, class, unit and legal for trade always wait for the office.
Nothing on the record changes until the office accepts your change, and the scale's certificate waits for that decision. Test the scale as you find it: the app judges your readings with your corrections, and the office's acceptance judges them again on the record. The job shows Your change to this scale is waiting for the office, and if the office doesn't accept it, the reason they gave.
Working offline and fixing problems
No signal
The app keeps working with no signal once it has been opened with signal that day:
- Your jobs and each scale's setup are stored on the device.
- Finished scales wait in the Sync tab and send by themselves later.
- Photos save on the device and upload later.
- Stickers print with no signal.
Scan sticker finds the scales on your jobs with no signal; a scale's full history needs signal.
These need signal: requesting a job, adding a scale found in the field, Finish this job (it asks you to finish once you're back online), and speaking readings (tap them in instead).
Common problems
| Problem | What to do |
|---|---|
| A job I expected isn’t on my list | Close and reopen the app with signal. If it’s still missing, the office hasn't assigned it to you — call them or request it. |
| "This job is closed" | The office has already approved it. Ask them to schedule a new visit to re-test. |
| The sync pill says "waiting to retry" or "needs attention" | Check you have signal, tap the pill and read the reason under the item. Tap Sync now to try again straight away. If it says Stuck, tell the office what it says. |
| "This scale needs the temperature and humidity" | Enter them on Finish up; the office requires them for this scale. |
| Sticker won't print | Check the printer is on, charged, paired and loaded; check the printer picked next to the button (Zebra and its dpi, Bluetooth printer, or Other label printer); print later from the job screen. |
| Bluetooth printer isn't in the list | Pair it in the phone's Bluetooth settings (pairing only in the printer maker's app isn't enough), then pick Bluetooth printer (TSPL) again or tap Change. If it's paired and still not listed, remove it in Bluetooth settings and pair it again. Use Chrome on Android, version 137 or later. |
| Bluetooth printer whirrs but nothing comes out | The labels loaded aren't the size of your company's sticker. Load the right labels and run the printer's own label calibration. Close any other app connected to the printer. |
| I picked the wrong weights | Before completing, go ← Back to step 1 and change them. After completing, tell the office in the internal note or by phone. |
| I entered a wrong reading and already completed it | Tell the reviewer. They return it to you so you can redo it. |
| "… is already finished on this job and locked" | That scale was already completed on this job. Tap Reopen next to it (until you finish the job), or ask the office to send it back. |
| "This screen couldn't open" | Tap Back to my jobs and try again. Nothing you entered is lost; drafts stay on the phone. If it keeps happening, tell the office. |
| A scale came back with a quality score | Read what's listed after the score, fix those things (photo, signature, note, weights) and complete it again. |
Glossary
| Term | Meaning |
|---|---|
| Acceptance tolerance | The tighter HB44 tolerance for a new, newly installed or just-repaired device. |
| Accuracy class | I, II, III, III L or IIII — how precise the scale is designed to be. Sets its tolerances. |
| Adjusted | Result when a scale passes As Left but its As Found readings differ from the As Left readings: something was adjusted. |
| Applied load | The certified weight actually placed on the scale for a test point. |
| As Found | Readings before any adjustment or repair. |
| As Left | Readings after your adjustments, as you leave the scale. |
| Audit (of a scale) | A reviewer's hand check of one scale on a job: its readings, photo and the program's quality score. |
| Audit trail | CertaCal's sealed record of every sign-in and every add, change or delete, with before and after values. |
| Build (increasing load) test | Readings taken as weight is added in steps. |
| Certificate | The customer's record of a calibration. Issued by CertaCal when a reviewer approves the job (or the calibration). Has a number, a QR code to verify it, and a digital (DCC) copy inside the PDF. |
| CLC | Concentrated load capacity: the most a vehicle scale section is rated to carry. A section test above it is allowed but flagged. |
| CoC | Certificate of Conformance — the NTEP or CTEP number showing a legal-for-trade model is type-approved. |
| County sealer | The county weights-and-measures office in California that receives placed-in-service reports. |
| DCC | Digital Calibration Certificate: a machine-readable copy of the certificate, embedded in the PDF. |
| Demo company | A practice company with made-up data, opened with Try the demo. Certificates are stamped DEMO and nothing is emailed. |
| Displayed weight | What the scale's indicator shows, written with every decimal place it shows (20.00, not 20). |
| Division (d) | The smallest step the indicator shows. |
| Drop (decreasing load) test | Readings taken as weight is removed in steps. |
| Error | Reading minus applied load. |
| HB44 | NIST Handbook 44 — the U.S. rules and tolerances for commercial weighing and measuring devices. |
| Health report | The summary page emailed to the customer with the certificates for a job. |
| Impact review | When a test weight or reference standard comes back from the lab out of tolerance, the check of every calibration it was used on since its last good certificate. |
| Intermediate check | A check of a test weight or reference material against a known reference between lab calibrations: every six months unless your company policy says otherwise. |
| Job | One visit to one customer location, with the scales to be done. |
| Job review | The reviewer's decision on a whole job: approved or sent back, with the program's score and the scales audited. |
| Kit | A set of the company's test weights that travel together, with a certificate. |
| Legal for trade | A device used to buy or sell by weight. State-regulated. |
| Location (site) | One address of a customer. A customer can have several. |
| Maintenance tolerance | The HB44 tolerance for devices in service. Used for routine calibrations. |
| N/A (not inspected) | A scale that couldn't be tested on the visit, with the reason. |
| Placed-in-service report | The form telling weights and measures a legal-for-trade device was installed, repaired, moved or removed. |
| Quality score | CertaCal's own score (out of 100) for a calibration, worked out from its record: tests done, readings, record complete, scale details. A job's score is the average. |
| Recall | Finding every certificate a weight was used on, e.g. when a weight is found out of tolerance. |
| Reference standard | A certified weight used as the "known" value. |
| Review | The office check of a job (or a calibration) before its certificates are issued. |
| Service agreement | A customer's or location's contract for regular service: its prices, how often visits happen, and its term. |
| Shift test | The same weight placed on each corner or quarter of the platform. |
| Tag (red / blue / yellow) | A weights-and-measures inspector's mark: out of service / stop-use / warning. |
| Tolerance | The largest error allowed at a test load. |
| Traceability | The unbroken chain of calibrations linking our weights to national standards. |
| Uncertainty | An estimate of how far our own measurement could be off. |
| Work instruction | The written procedure for a kind of scale, shown to the technician. |
| Works in the field | A setting for an owner, office admin or quality manager who also does calibrations: they can be dispatched jobs. |